fbpx

Essential AWS Services for Database Administrators to Learn

Why AWS?

Cloud is becoming a vital part of Database Administration because it provides various database services & Infrastructure to run Database Ecosystems instantly. AWS (Amazon Web Services) is one of the pioneers in the Cloud according to the Gartner magic quadrant. Knowing more cloud infrastructure technologies is going to give more mileage to your Administrator career. In this article, you will find some of the AWS services which Database Administrators should know as they are basic to run Database opration.

Essential AWS Services List For Database Administrator (DBA)

Network
VPCs
Subnets
Elastic IPs
Internet Gateways
Network ACLs
Route Tables
Security Groups
Private Subnets
Public Subnets
AWS Direct Connect

Virtual Machine 
EC2
AWS Work Space

Storage
EBS
EFS
S3

Database as Services (RDS)
MySQL / MariaDB
PostgreSQL
Oracle
Micrsoft SQL Server
AWS Aurora PostgreSQL/MySQL

Database Managed Services
AWS Dynamo DB
AWS Elasticsearch 
Amazon DocumentDB

Messaging & Event Base Processing 
Apache Kafka (Amazon MSK)


Warehousing/ OLAP /Analytics Stagging DB
AWS Redshift


Monitoring 
Cloud watch
Amazon Grafana
Amazon Prometheus


Email Service
Amazon Simple Notification Service

Security 
IAM
Secrets Manager

Database Task Automation
AWS Batch
AWS Lambda
Cloud Formation

Command-line interface (CLI) to Manage AWS Services
AWSCLI

Migration 
Database Migration Service

Budget 
AWS Cost Explorer
AWS Budgets

Some other Services & Combination worth of Exploring

Bastion Host For DBA
MongoDB running on EC2
ELK (Elastic Search , LogStach, Kibana) running on EC2
Tunnels for Non stranded ports for Database Connections for more security
pg_pool or pg_Bouncer for PostgreSQL Databases

Stay Tuned For Latest Database, Cloud & Technology Trends

Read More >>
Running MongoDB on Docker Compose

In this article, we will discuss how DBA can run a MongoDB instance using docker-compose. It’s very easy and quite flexible to handle. According to my opinion docker-compose removes all the installation and configuration pain when you need a test instance immediately. In a non-production environment for proof of concepts (POC) environment, you can easily use MongoDB on docker-compose.


High-Level Steps for Installation & Configuration

  • Install Docker 
  • Install Docker compose
  • Take the docker-compose code with MongoDB 
  • Run the docker-compose 
  • Connect to MongoDB Database
  • Connect From MongoDB from Docker bash

Prerequisites

mkdir -p /opt/docker_com_repo

cd /opt/docker_com_repo

vi docker-compose.yml

Copy Below docker compose code for MongoDB and paste in side the docker-compose.yml


IMP: Remove all the comments with “< abc>” From compose code

mkdir -p  /opt/mongo/datafiles/db

mkdir  -p /opt/mongo/configfiles

Docker Compose Code

version: ‘3.3’   
services:
mongodb_container:
container_name: mongodb4.0                                                                 
image: mongo:4.0                                                                                          < Container Image>
environment:
MONGO_INITDB_DATABASE: thedbadmin                                             
MONGO_INITDB_ROOT_USERNAME: root                                                < Database Admin username>
MONGO_INITDB_ROOT_PASSWORD: oracle                                          < Database Admin Password>
ports:
– 27017:27017                                                                                                     
volumes:
– /opt/mongo/datafiles/db:/data                                                     < Persistent Volume for Data files>
– /opt/mongo/configfiles:/etc/mongod                                          < Persistent volume for MongoDB configuration file>

Ruing Docker Compose

cd /opt/docker_com_repo

docker-compose up -d

Check if the MongoDB instance started?

[root@master01 mongodb]# docker-compose ps
Name Command State Ports
———————————————————————————————–
mongodb4.0 docker-entrypoint.sh mongod Up 0.0.0.0:27017->27017/tcp,:::27017->27017/tcp

Test Database connection

[root@master01 mongodb]# telnet localhost 27017
Trying ::1…
Connected to localhost.
Escape character is ‘^]’.

if looks good than go for the next step or stop the Linux firewall 

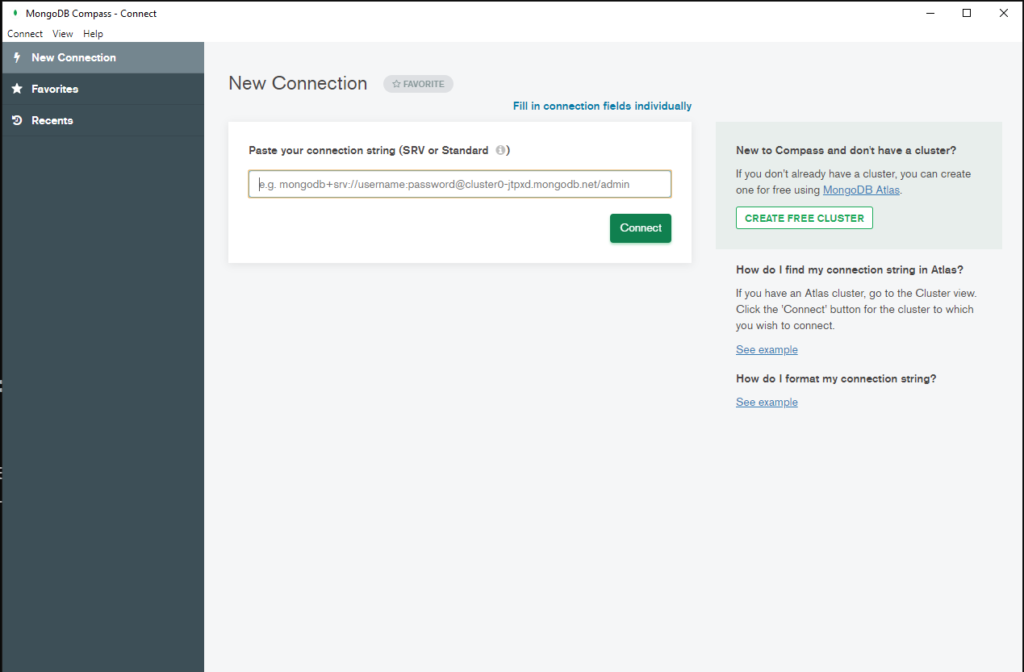
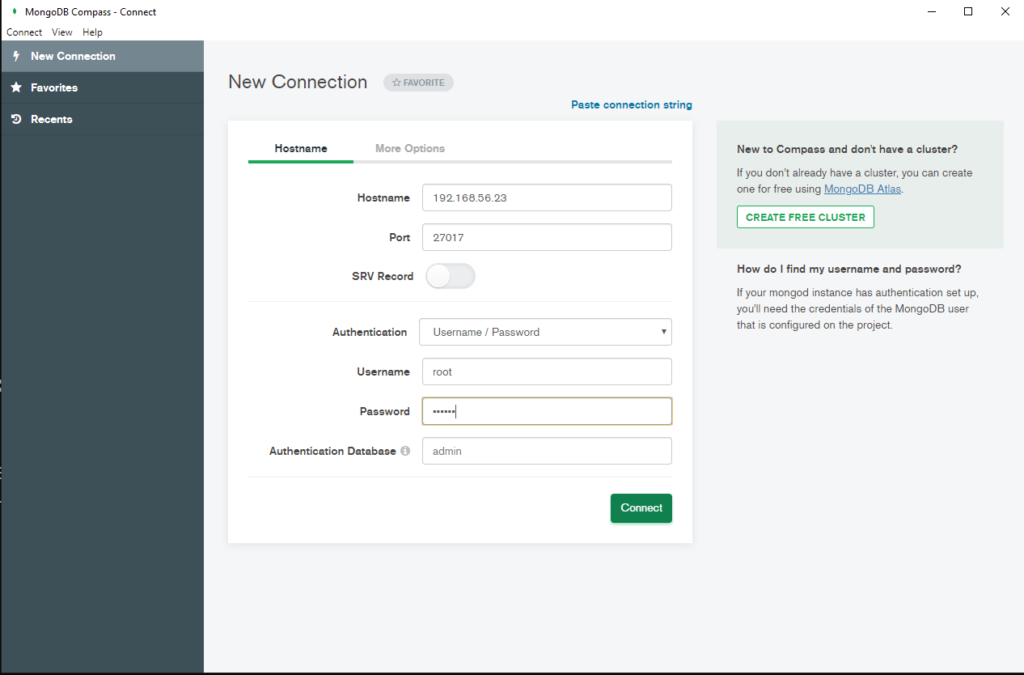
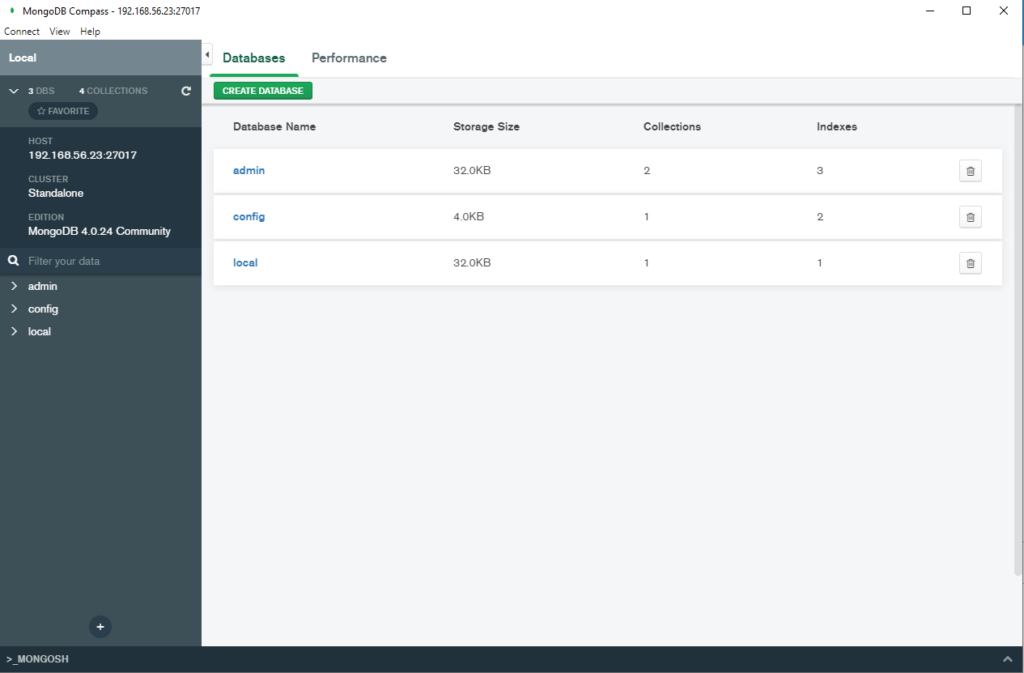
Open MongoDB compass and connect to Database. Follow the screenshots 

Click on “Fill in connection Fields individually

Change the hostname as per your server or machine

You can hit Create database and start using MongoDB

Connect MongoDB from the command Line 

[root@master01 mongodb]# docker exec -it mongodb4.0 bash

root@58054f03c382:/# mongo -u root -p
MongoDB shell version v4.0.24
Enter password:
connecting to: mongodb://127.0.0.1:27017/?gssapiServiceName=mongodb
Implicit session: session { “id” : UUID(“0d7bb9a1-9549-491c-89c3-dfc9caab7547”) }
MongoDB server version: 4.0.24
Server has startup warnings:
2021-10-02T09:05:13.292+0000 I CONTROL [initandlisten]
2021-10-02T09:05:13.293+0000 I CONTROL [initandlisten] ** WARNING: /sys/kernel/mm/transparent_hugepage/enabled is ‘always’.
2021-10-02T09:05:13.293+0000 I CONTROL [initandlisten] ** We suggest setting it to ‘never’
2021-10-02T09:05:13.293+0000 I CONTROL [initandlisten]
2021-10-02T09:05:13.293+0000 I CONTROL [initandlisten] ** WARNING: /sys/kernel/mm/transparent_hugepage/defrag is ‘always’.
2021-10-02T09:05:13.293+0000 I CONTROL [initandlisten] ** We suggest setting it to ‘never’
2021-10-02T09:05:13.293+0000 I CONTROL [initandlisten]

Enable MongoDB’s free cloud-based monitoring service, which will then receive and display
metrics about your deployment (disk utilization, CPU, operation statistics, etc).

The monitoring data will be available on a MongoDB website with a unique URL accessible to you
and anyone you share the URL with. MongoDB may use this information to make product
improvements and to suggest MongoDB products and deployment options to you.

To enable free monitoring, run the following command: db.enableFreeMonitoring()
To permanently disable this reminder, run the following command: db.disableFreeMonitoring()

> show databases;
admin 0.000GB
config 0.000GB
local 0.000GB

Stay Tuned For latest Database, Cloud & Technology Trends

Read More >>

AWS Services and their Azure alternatives 

AWS vs Azure Service Names

In this article, I have listed  AWS services and their Azure alternatives with Name. AWS and Azure are becoming the most vital choice while building cloud infrastructure. I know most of the AWS services and working with them and trying to develop knowledge about Azure services which can be used as alternatives to AWS services. For example, people ask what is the s3 equivalent in azure? Mean to ask if I want to stage my files like AWS s3 which Azure service can be used.
AWS Services and their Azure Alternatives


Service Name Amazon AWS Microsoft Azure
Cloud VM/ Compute AWS EC2 Virtual Machine
PaaS Elastic Beanstalk Apps Service
PaaS Elastic Beanstalk Cloud service
Compute AWS Lambda Azure Function
Filestore / File staging AWS S3 Azure Storage
Directory Service AWS Cognito Azure Active Directory
Notification AWS SNS, SQS Event Grid, Service Bus
Analytics AWS Kinesis, Athena Azure Stream Analytics, Event Hub
Developer tools AWS Developer tools Application Insights
API AWS API Gateway API Management, Azure Functions, Proxies
Block storage AWS EBS Azure Blob Storage
Relational Database Service AWS Relational Database Service Azure SQL Database
Big Data/ Hadoop AWS EMR Azure HDInsight
Monitoring / Alarm AWS cloud watch azure monitor
File Archival AWS Glacier Azure Archive storage
CDN (Content Delivery Network) AWS Cloudfront Delivery Network
File System AWS EFS Azure Files
Kubernatice AWS EKS Kubernetes services
Managed WareHouse AWS Redshift SQL WareHouse
Orchestration AWS Step Functions Azure Logic Apps
Docker/Container AWS ECS Azure Container Services
video analysis Amazon Rekognition Azure Cognitive Services
IoT AWS IoT Azure IoT
ETL (Extraction Transformation and Loading ) AWS glue azure data catalog
DNS AWS Route 53 Azure DNS
Virtual Network AWS VPC Azure VNet
Blockchain Amazon Managed Blockchain Azure Blockchain Service
Machine Learning Amazon SageMaker
Amazon CodeGuru
Amazon Comprehend
Amazon Forecast
Amazon Fraud Detector
Amazon Kendra
Amazon Lex
Amazon Machine Learning
Amazon Personalize
Amazon Polly
Amazon Rekognition
Amazon Textract
Amazon Transcribe
Amazon Translate
AWS DeepLens
AWS DeepRacer
Amazon Augmented AI
AWS DeepComposer
Azure Machine Learning services
Billing Per Hour Per Minute


Like our Facebook Page


Read More

How to connect PostgreSQL Database from PgAdmin
How to create AWS rds PostgreSQL Database
Convert pem to ppk
How to Install PuTTy on Window
How to Install and create AWS EC2 Instance using Terraform
AWS MySQL RDS Database Creation using AWSCLI
How to Create MySQL Database with AWS RDS
How to connect to AWS MySQL / MariaDB RDS or EC2 database from MySQL WorkBench

How to Manage AWS S3 Bucket with AWS CLI

How to Manage AWS S3 Bucket with AWS CLI (Command Line)
 

In this article, we are going to see how we can manage the s3 bucket with AWS s3 CLI commands. AWS s3 CLI command is easy really useful in the case of automation. Using AWS s3 cli you can mange S3 bucket effectively without login to AWS console.

Prerequisites

  • AWS Access Key ID
  • AWS Secret Access Key
  • AWS CLI should be configured on your laptop or desktop.   You can see my article for the AWS CLI configuration.


List of Commands to manage AWS s3


#1. Create AWS s3 bucket

aws s3api create-bucket --bucket thedbadminbuk --region us-east-1
{
    "Location": "/thedbadminbuk"
}


#2. List all the S3 bucket which are already created

aws s3 ls
2020-04-13 15:22:48 abhitest1410
2020-04-13 18:00:54 thedbadminbuk


#3.  List all the bucket data

aws s3 ls s3://thedbadminbuk


#4. List all the data inside the directory inside the bucket

aws s3 ls s3://thedbadminbuk --recursive


#5. Copy file to s3 bucket

aws s3 cp server.txt s3://thedbadminbuk
upload: ./server.txt to s3://thedbadminbuk/server.txt


#6. Copy file to s3 bucket to another s3 bucket

aws s3 cp s3://thedbadminbuk123/server.txt s3://thedbadminbuk
upload: s3://thedbadminbuk123/server.txt to s3://thedbadminbuk/server.txt


#7. Copy Directory to S3 bucket

aws s3 cp Desktop s3://thedbadminbuk --recursive


#8. Copy Directory from one S3 bucket to another s3 bucket

aws s3 cp s3://thedbadminbuk123/Desktop s3://thedbadminbuk --recursive


#9.  Move file from local file system to s3 bucket

aws s3 mv server.txt s3://thedbadminbuk/client.txt


#10. Move file from one s3 bucket to another s3 bucket

aws s3 mv s3://thedbadminbuk/server.txt s3://thedbadminbuk/client.txt
aws s3 mv s3://thedbadminbuk/client.txt s3://thedbadminbuk/client.txt


#11. Move file from s3 bucket to local file system

aws s3 mv s3://thedbadminbuk/client.txt /tmp
move: s3://thedbadminbuk/client.txt to ../../tmp/client.txt


#12. Delete file from s3 bucket

aws s3 rm s3://thedbadminbuk/client.txt
delete: s3://thedbadminbuk/client.txt


#13. Delete Directory  from s3 bucket

aws s3 rm s3://thedbadminbuk/Desktop
delete: s3://thedbadminbuk/Desktop


#14. Sync file form local file system to s3 bucket

aws s3 sync Desktop s3://thedbadminbuk/


#15. Sync from s3 bucket to the local folder

aws s3 sync s3://thedbadminbuk/Desktop Desktop


#16. Presign URL for any S3 bucket objects. It will give you an https link to access the object from the browser or can embed it into the code. Like jpeg file etc.

aws s3 presign s3://thedbadminbuk/server.txt
https://thedbadminbuk.s3.amazonaws.com/server.txt?AWSAccessKeyId=AKIA5Q6SWIBFKZURW2DX&Expires=1586786199&Signature=qK5wPSzykmQB1tJjQLMKrf8vnys%3D


#17. Presign URL with expires value. It means presign URL will expire in 600 seconds.

aws s3 presign s3://thedbadminbuk/server.txt --expires-in 600
https://thedbadminbuk.s3.amazonaws.com/server.txt?AWSAccessKeyId=AKIA5Q6SWIBFKZURW2DX&Expires=1586783700&Signature=nMqqEHfcxu1HUbg0%2BWnp7sdSwp0%3D


#18. Delete s3 bucket

Desktop aws s3 rb s3://thedbadminbuk
remove_bucket failed: s3://thedbadminbuk An error occurred (BucketNotEmpty) when calling the DeleteBucket operation: The bucket you tried to delete is not empty


➜  Desktop aws s3 rb s3://thedbadminbuk --force
delete: s3://thedbadminbuk/551222XXXXXXXXXX.PDF
delete: s3://thedbadminbuk/Old Desktop/Screenshot.png


#19. Check bucket file size

➜  ~ aws s3 ls s3://thedbadminbuk --recursive  --human-readable
2020-04-13 18:40:12   10.0 KiB .DS_Store
2020-04-13 18:40:12    0 Bytes .localized
2020-04-13 18:40:12  193.2 KiB 5523XXXXXXXXXX68_16-03-2020.PDF
2020-04-13 18:40:28  162.7 KiB Old Desktop/Screenshot 2020-03-29 at 5.56.10 PM.png
2020-04-13 18:40:28  160.8 KiB Old Desktop/Screenshot 2020-03-29 at 5.56.57 PM.png
2020-04-13 18:40:12  164.9 KiB Old Desktop/Screenshot 2020-03-29 at 6.49.44 PM.png
2020-04-13 18:40:12  174.9 KiB Old Desktop/Screenshot 2020-03-29 at 6.49.57 PM.png
2020-04-13 18:40:14   66.4 KiB Old Desktop/Screenshot 2020-04-03 at 3.21.08 PM.png
2020-04-13 18:40:12  112.3 KiB Old Desktop/Screenshot 2020-04-04 at 11.19.30 PM.png
2020-04-13 18:40:12   98.7 KiB Old Desktop/Screenshot 2020-04-06 at 1.31.14 AM.png
2020-04-13 18:40:12  102.6 KiB Old Desktop/Screenshot 2020-04-06 at 1.44.48 AM.png
2020-04-13 18:40:12  104.2 KiB Old Desktop/Screenshot 2020-04-06 at 1.46.23 AM.png
2020-04-13 18:40:12  115.4 KiB Old Desktop/Screenshot 2020-04-06 at 4.38.17 PM.png
2020-04-13 18:40:13    3.7 KiB Old Desktop/Screenshot 2020-04-10 at 10.49.35 AM.png


#20.  Total s3 Bucket size

➜  ~ aws s3 ls s3://thedbadminbuk --recursive  --human-readable --summarize
2020-04-13 18:40:12  193.2 KiB 5523XXXXX.PDF
2020-04-13 18:40:28  162.7 KiB Old Desktop/Screenshot10 PM.png
2020-04-13 18:40:28  160.8 KiB Old Desktop/Screenshot57 PM.png
2020-04-13 18:40:12  164.9 KiB Old Desktop/Screensho44 PM.png
2020-04-13 18:40:12  174.9 KiB Old Desktop/ScreenPM.png
2020-04-13 18:40:14   66.4 KiB Old Desktop/Scrpng
2020-04-13 18:40:27   85.1 KiB psql/4.png
2020-04-13 18:40:27  192.9 KiB psql/5.png
2020-04-13 18:40:27  107.9 KiB psql/6.png
2020-04-13 18:40:27  152.3 KiB psql/7.png
2020-04-13 18:40:27   72.0 KiB psql/8.png
2020-04-13 18:40:28   94.0 KiB psql/9.png
2020-04-13 18:40:28    0 Bytes test123
2020-04-13 18:40:28   59 Bytes todo.txt

Total Objects: 117
   Total Size: 17.8 MiB


#21. Exclude file while copy

aws s3  cp  ~/thedbadmin s3://thedbadminbuk/  --recursive --exclude ".ssh/*"
aws s3  cp ~/thedbadmin  s3://thedbadminbuk/  --recursive  --exclude   "thedb*.txt"


#22.  Include and exclude file while file copy.

aws s3 cp ~/thedbadmin s3://thedbadminbuk/ --recursive --exclude "*" --include "*.bash"
aws s3 cp ~/thedbadmin s3://thedbadminbuk/ --recursive --exclude "*" --include "*.sh" --include "*.bash"


Like our Facebook Page


Read More

How to connect PostgreSQL Database from PgAdmin
How to create AWS rds PostgreSQL Database
Convert pem to ppk
How to Install PuTTy on Window
How to Install and create AWS EC2 Instance using Terraform
AWS MySQL RDS Database Creation using AWSCLI
How to Create MySQL Database with AWS RDS
How to connect to AWS MySQL / MariaDB RDS or EC2 database from MySQL WorkBench

How to connect PostgreSQL Database from PgAdmin

How to connect PostgreSQL Database from PgAdmin

In this article, we are going to see how we can connect to the PostgreSQL database from pgadmin. Its a GUI tool to manage and administer the PostgreSQL database. Using pgadmin, you can create and monitor PostgreSQL databases. You can get the pgadmin from offical website. Before you connect to any database from pgadmin you need valid hostname/AWS RDS endpoint and port. Also, you should have valid database credentials.

Steps to connect to PostgreSQL Database from PGAdmin

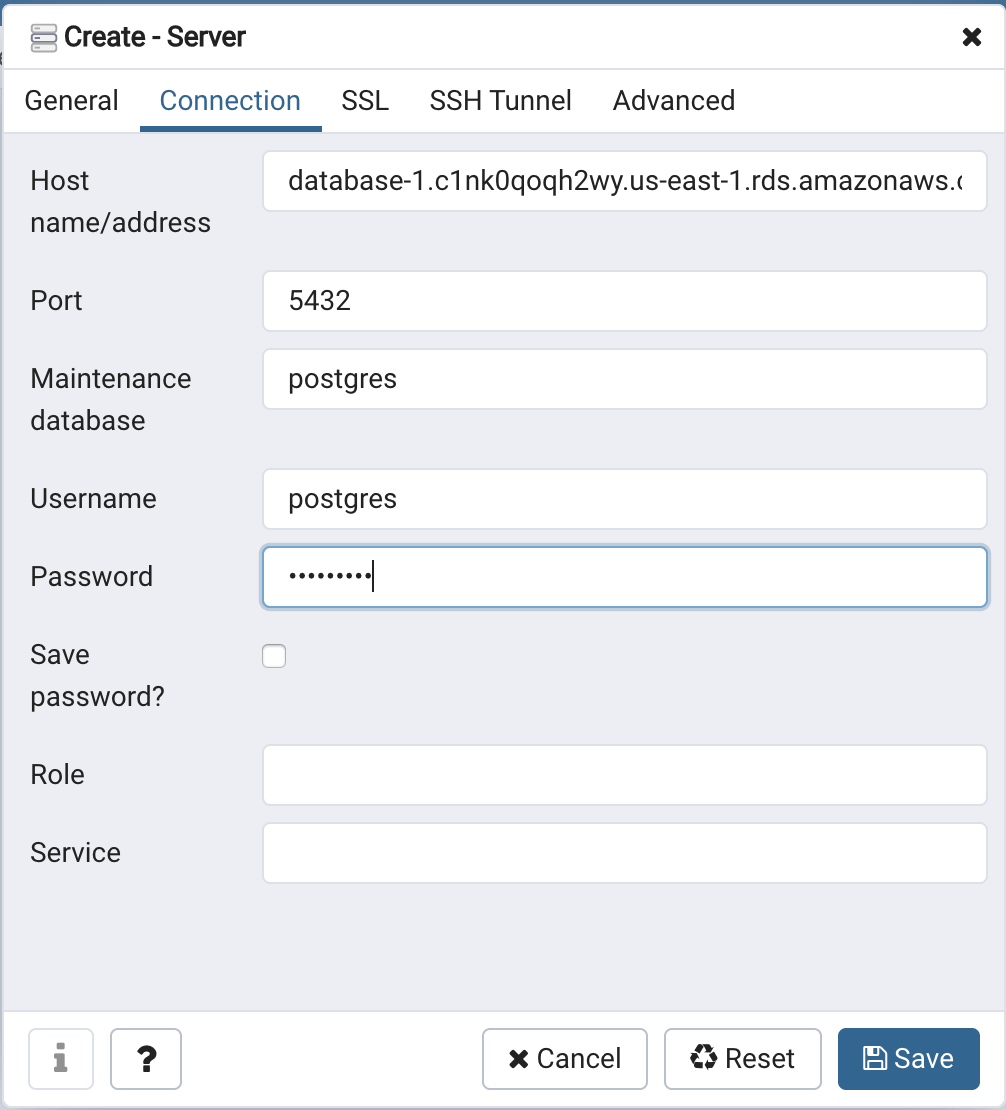
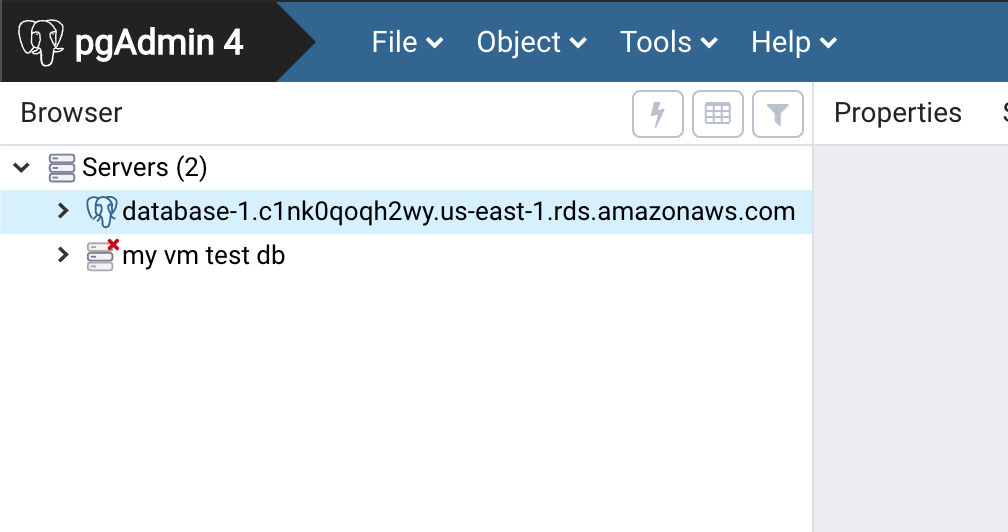
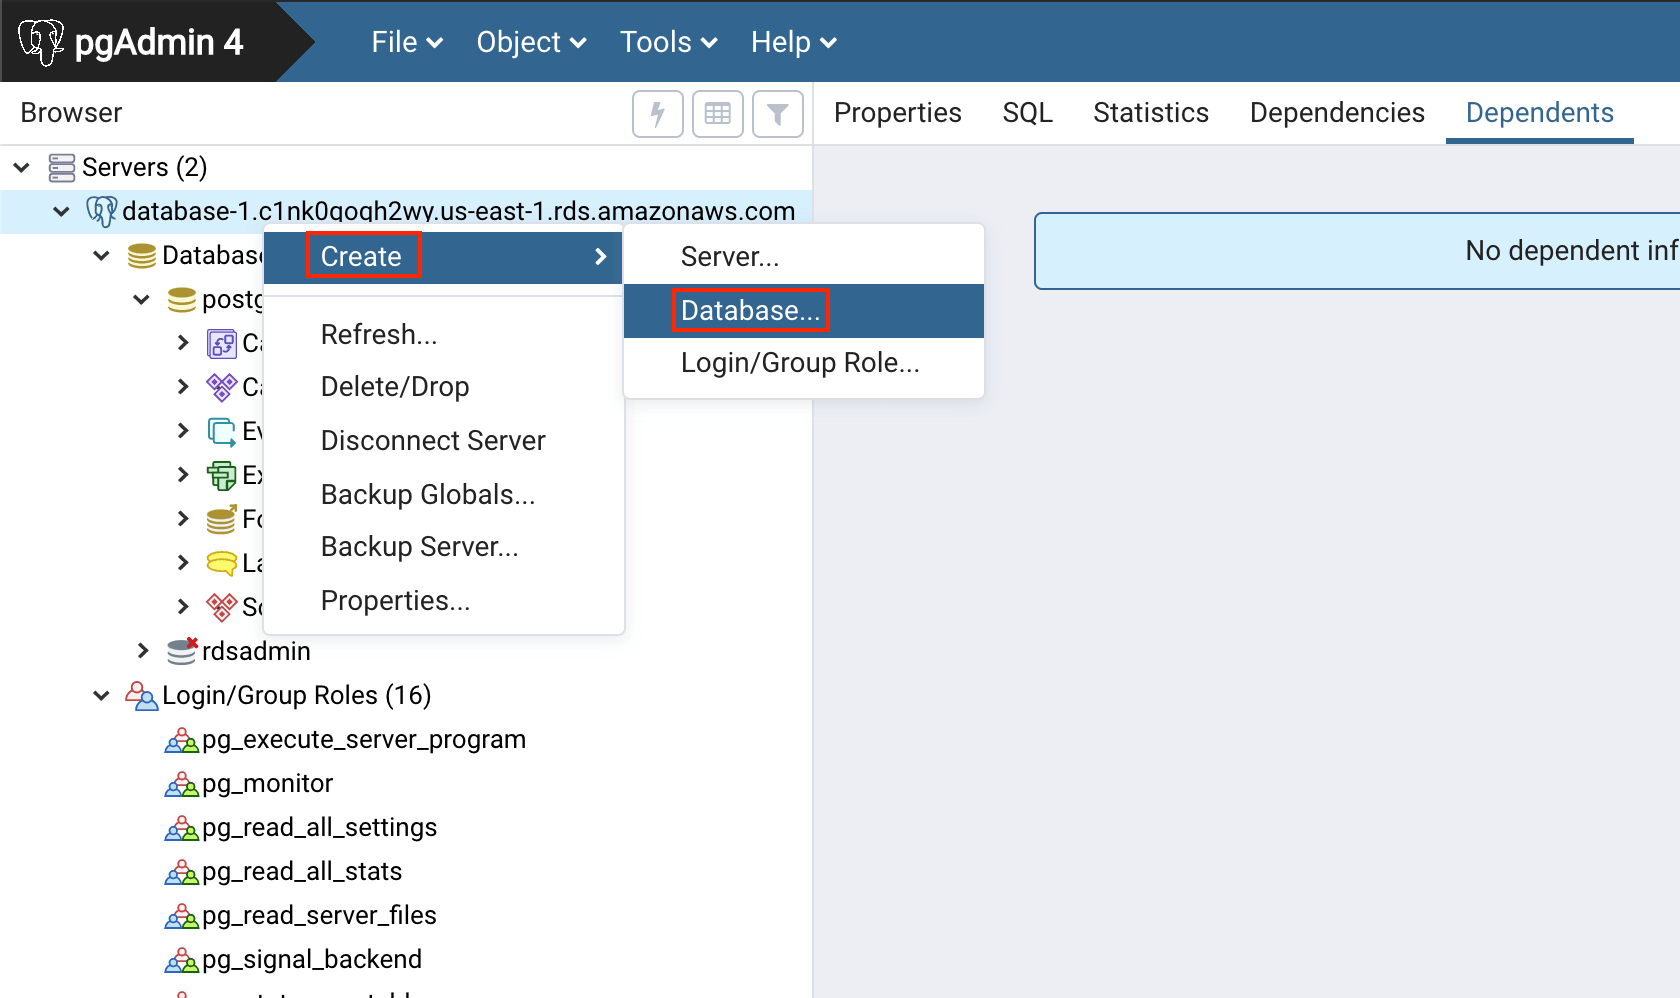
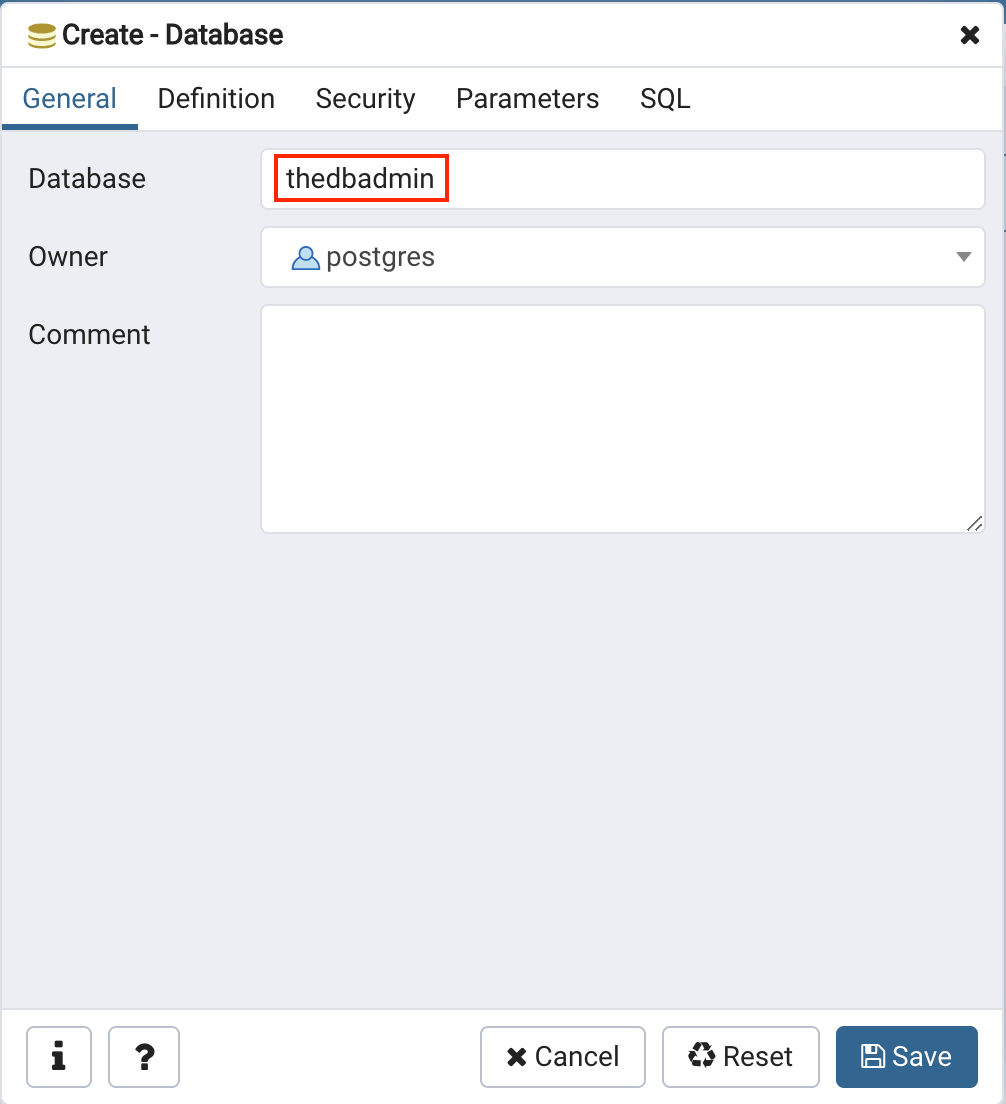
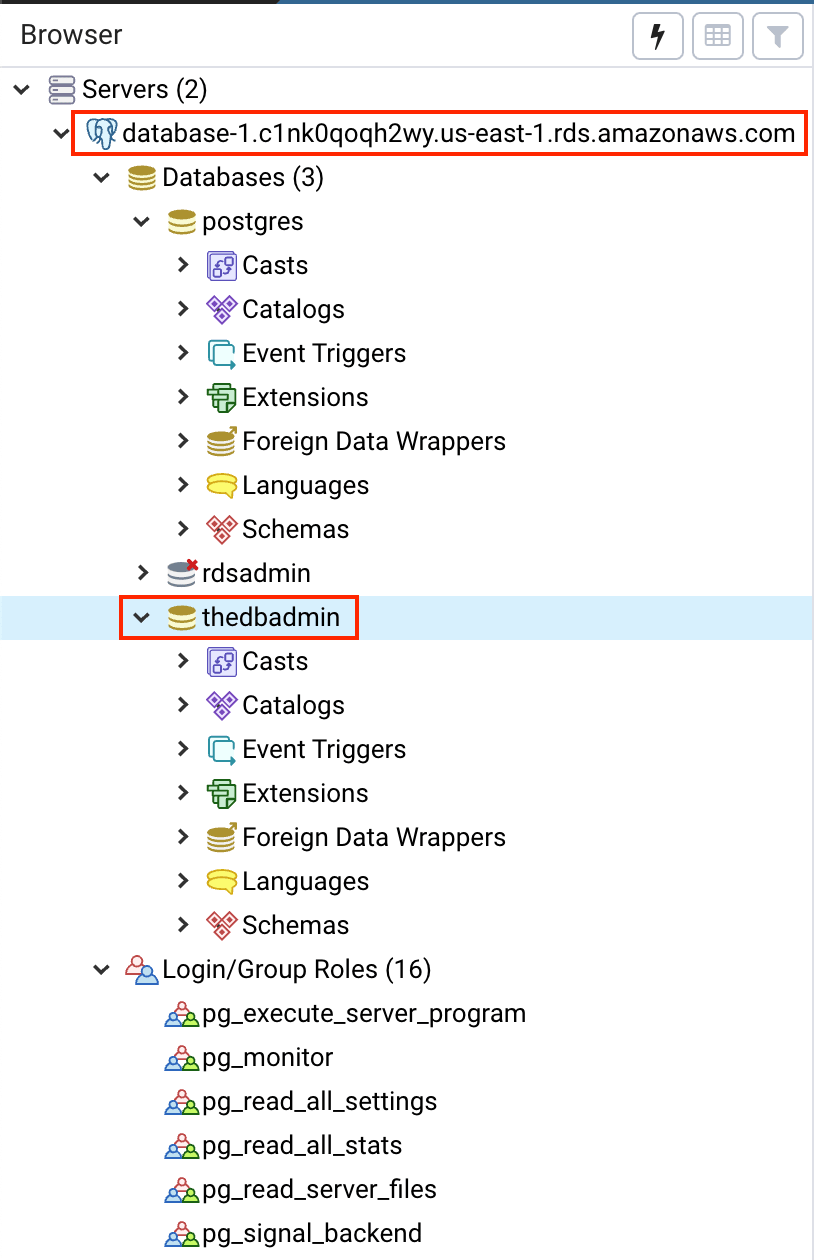
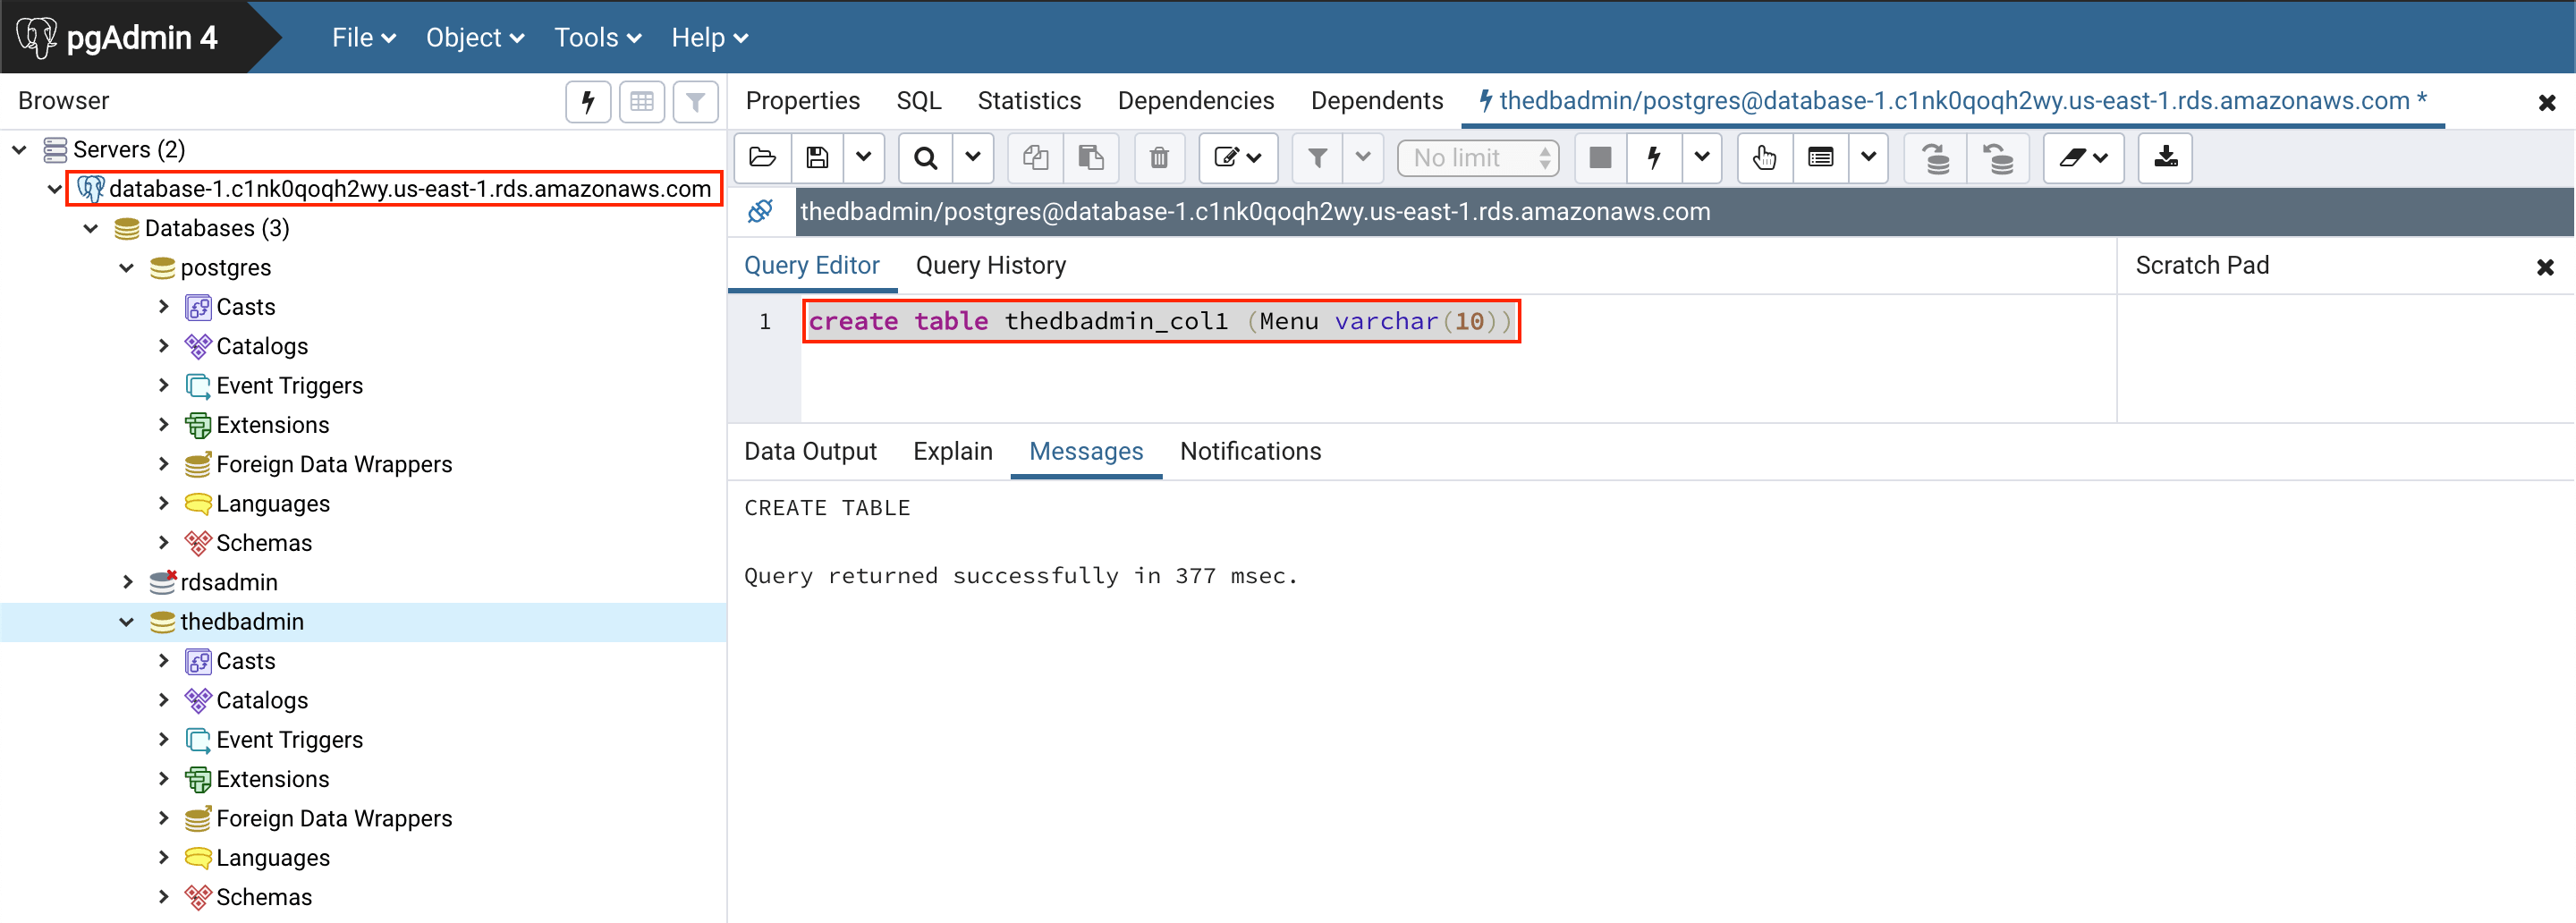
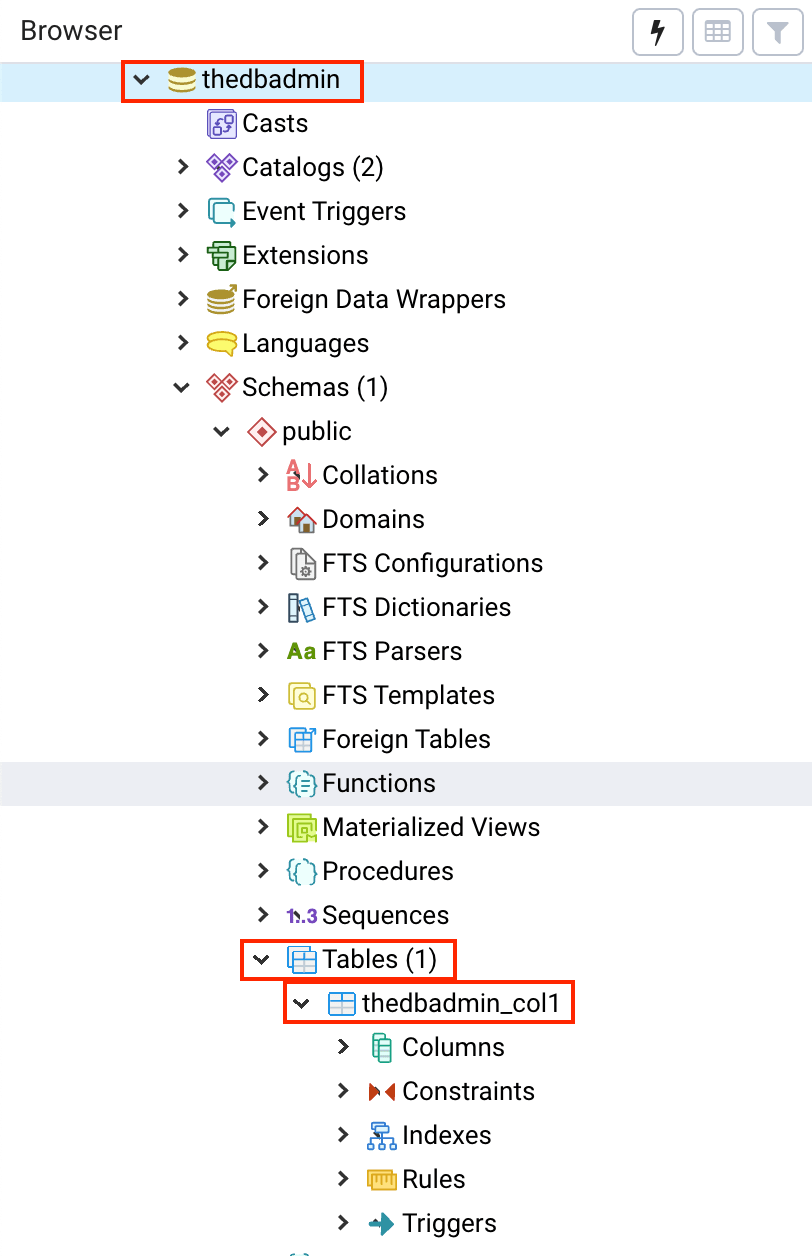
#1. Open the pgadmin utility #2. Go to servers right click add server #3. Enter the Host Name/IP or AWS RDS endpoint name. #4. Once you have added it successfully. Open and try to access the remote database. #5. Create a database for testing #6.  Give database name and click on ‘save‘. #7. Once created successfully it will ve visible under your connection name. #8. Create a table under the newly created database. #9. You can see the newly created table under the database ‘thedbadmin’. I hope you like this article. Please comment if you have any doubt. Like our Facebook page Read more AWS MySQL RDS Database Creation using AWS CLI How to Create MySQL Database with AWS RDS How to connect to AWS MySQL / MariaDB RDS or EC2 database from MySQL WorkBench How to Become Oracle apps DBA? What does DBA mean? 150 Oracle DBA Interview Questions Top 5 Future Technologies for Database Administrators (DBA) to learn in 2020 Top 5 Software Technology Trends in 2020 List

How to create AWS RDS PostgreSQL Database

How to create AWS rds PostgreSQL Database


In this article, we are going to talk about detailed steps to create an AWS Postgres database instance on AWS cloud. Amazon RDS has two options for PostgreSQL. The first one is the normal AWS Postgres RDS database and Another one is aurora PostgreSQL. AWS Postgres gives you a lot of performance gain and HA options comparing with the normal data center (DC) database. You can get AWS Postgres with few steps. I have mentioned all possible details in the post about AWS PostgreSQL. If you need any AWS PostgreSQL pricing details you can open the AWS calculator portal and can get details about estimated the cost.
In case if you have any question let me know my comments. Let’s start creating an AWS PostgreSQL RDS database instance.


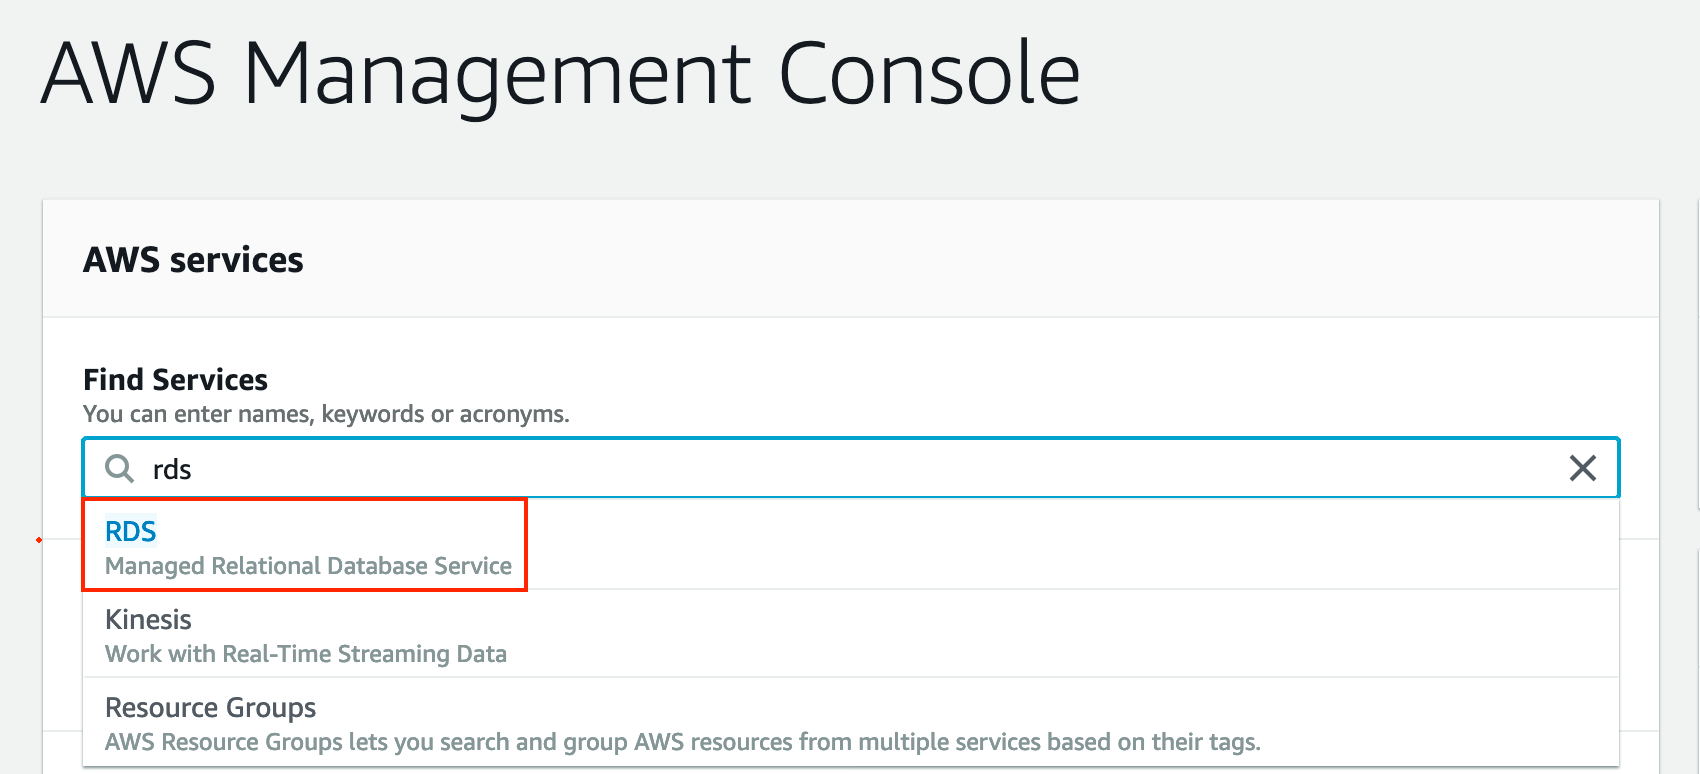
1# Login to AWS console and Search for ‘RDS‘.


#2. Click on create on Database


#3. Select PostgreSQL .


#4.  Select the database template. In my case, I have selected ‘Free tier’ you can select ‘Production’ or ‘Dev/Test‘ according to your requirement. Production and Dev/test will not be free from the day one it will be chargeable.


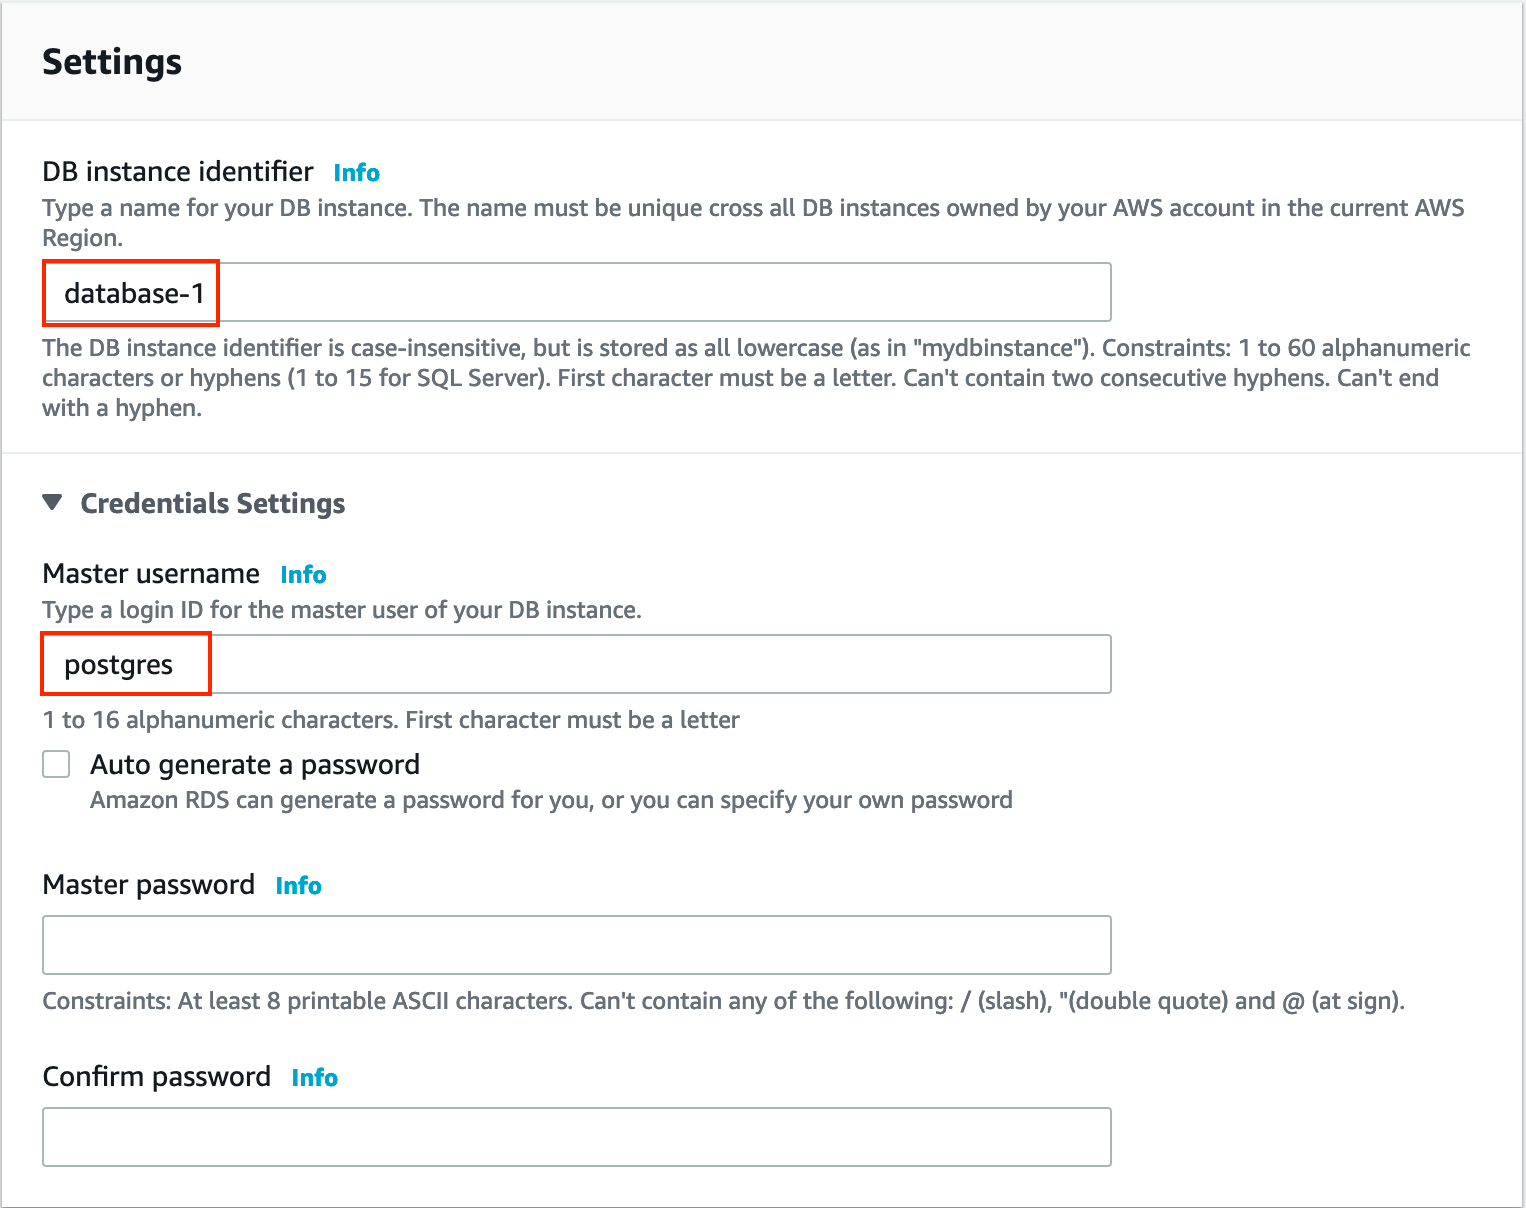
#5. Give some meaningful database name and Master database username with password.


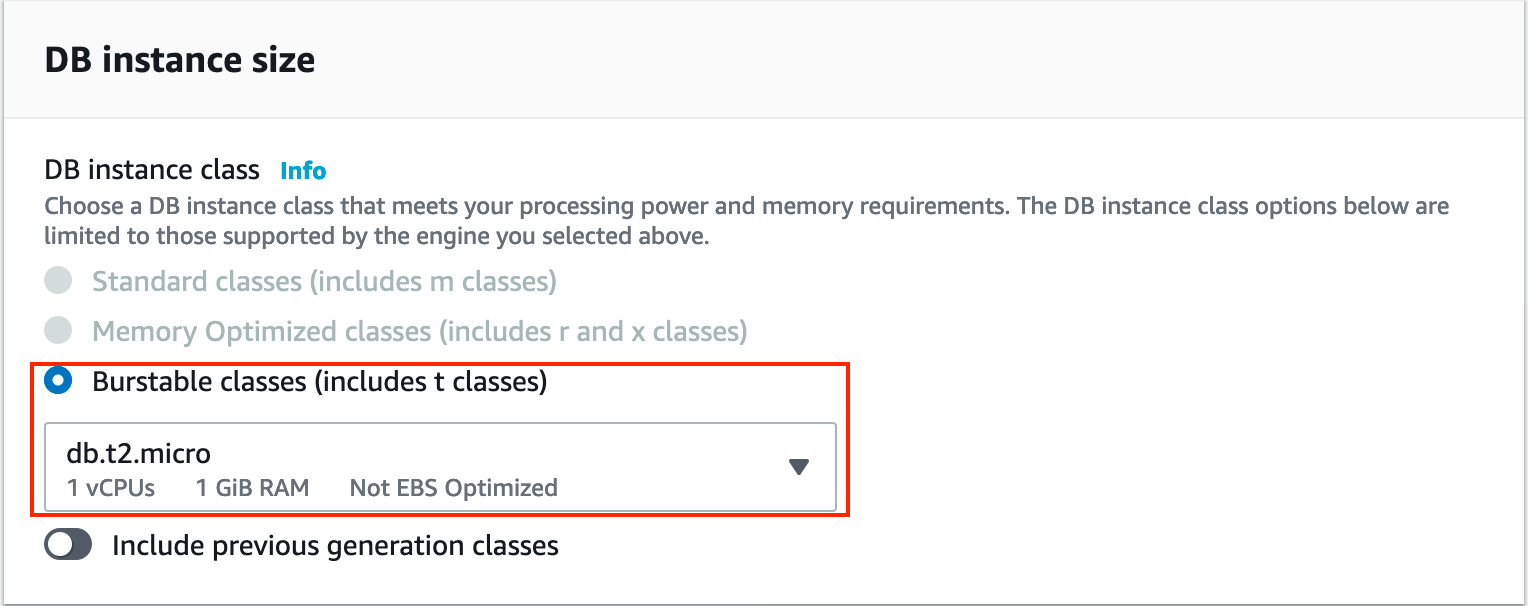
#6. I have selected the free database classes which come with the free tier.


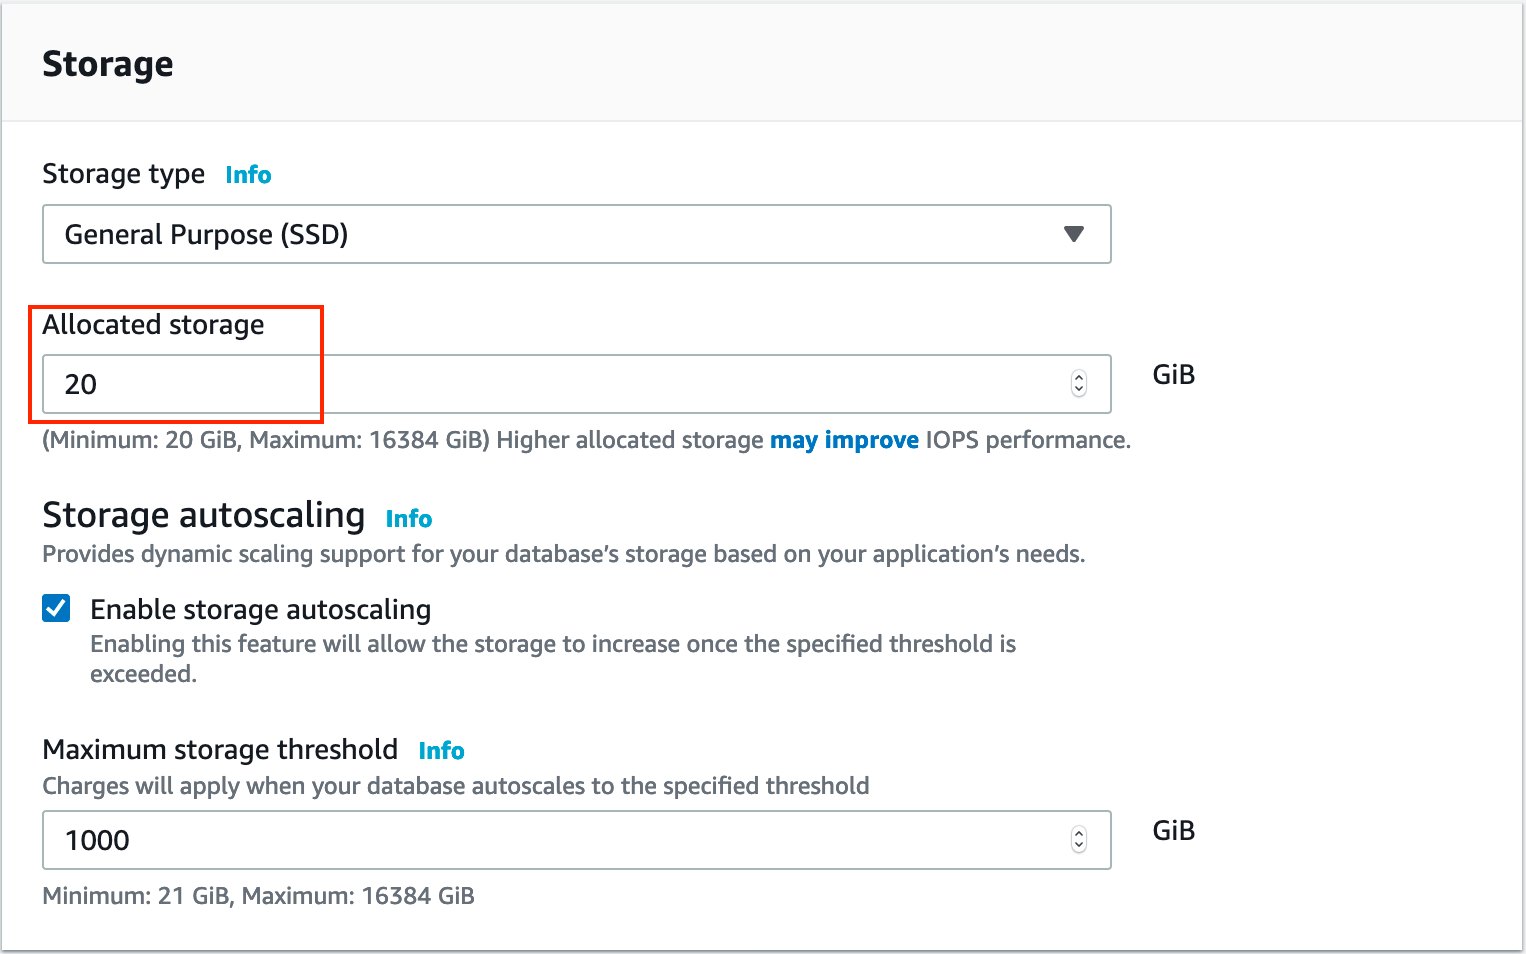
#7. Based on your database storage needs to select the ‘Allocated space’.


#8. If your database is business-critical you can choose a Multi-Availability Zone for database high availability.


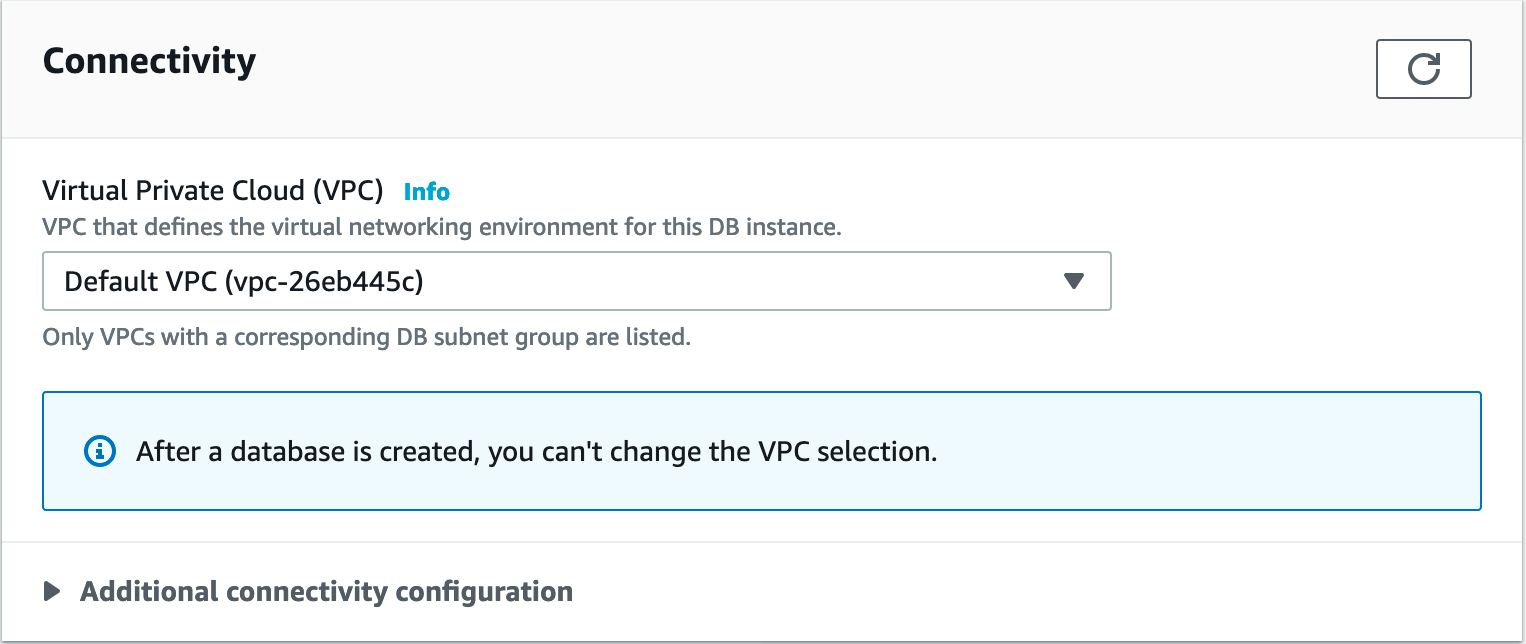
#9. Chose the default VPC. If you are configuring it for Production or development chose the appropriate VPC using the dropdown button.


[su_box title=”IMP Note for Additional connectivity configuration” box_color=”#fe2227″ title_color=”#101112″]In case if you like to access the database from your laptop/Desktop. Select the option ‘Publicly Accessible‘ to yes.[/su_box]


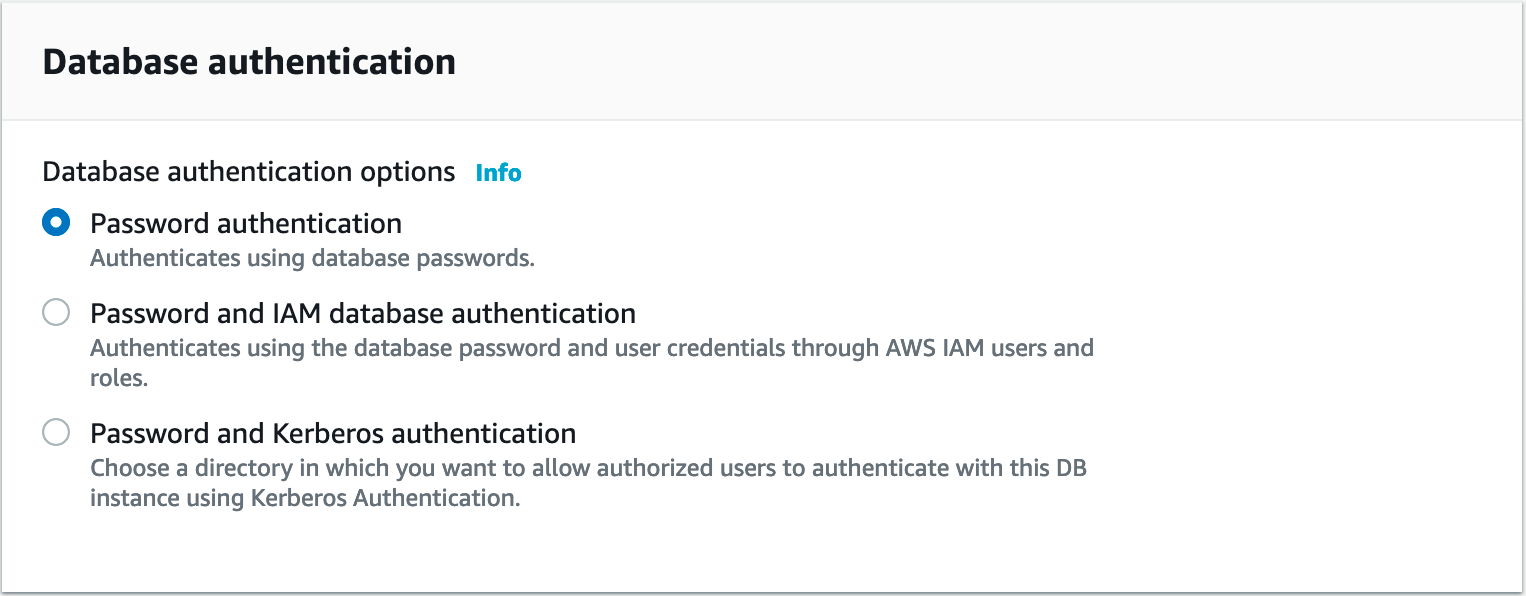
#10. Chose the option according to your application and the AWS ecosystem setup.


#11.  To enable  Cloudwatch logs or backup you can configure ‘Additional configuration‘.


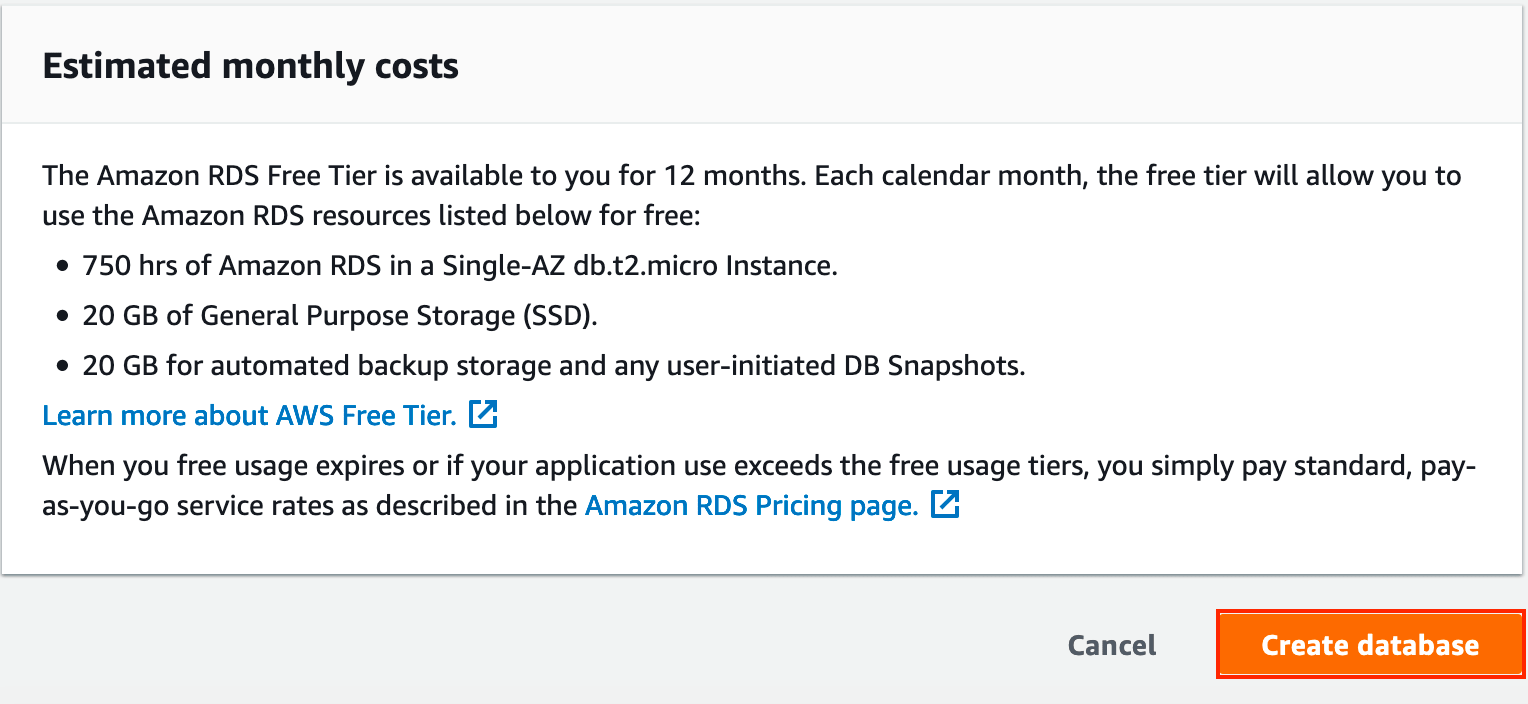
#12. Click on ‘Create Database


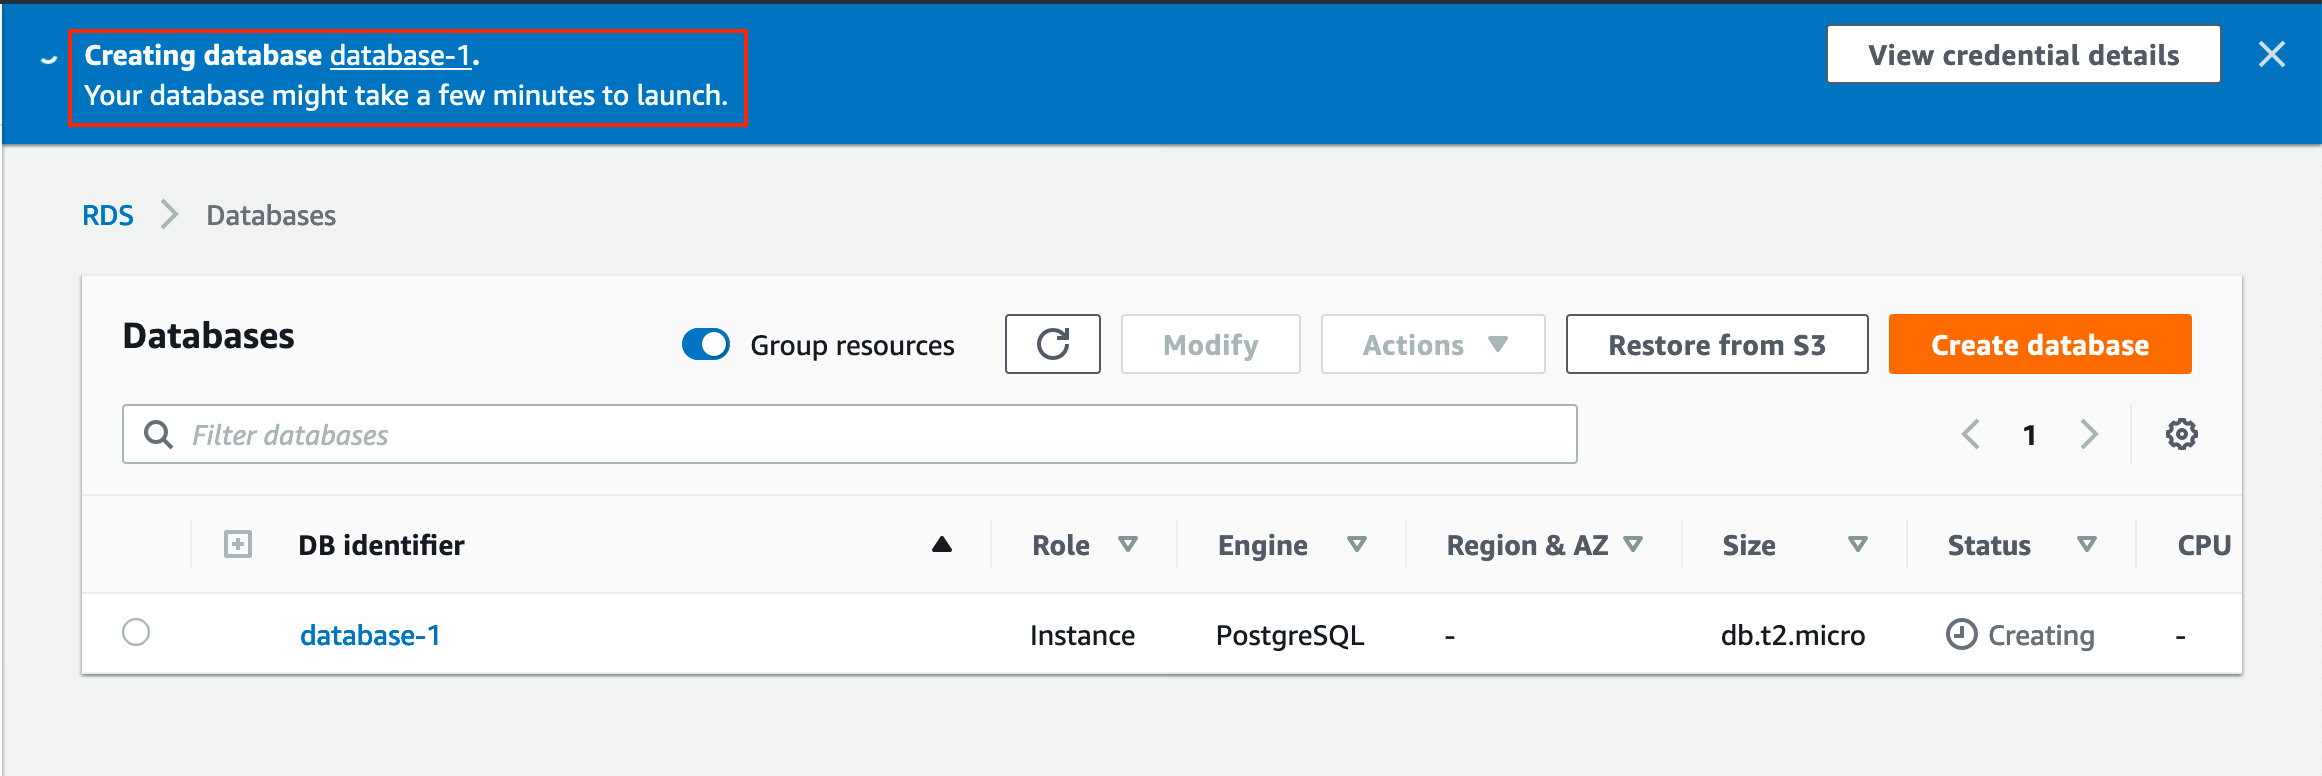
#13.  It will take a few minutes to create database.


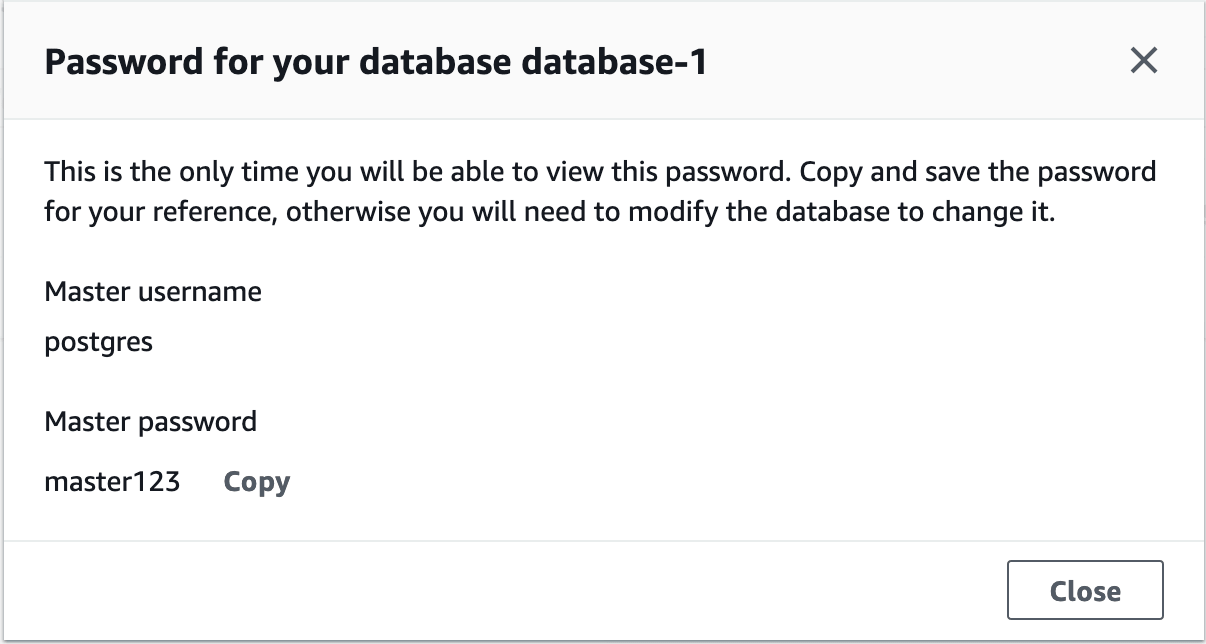
#14.  You can view the database credentials after clicking on ‘View credentials details‘ .


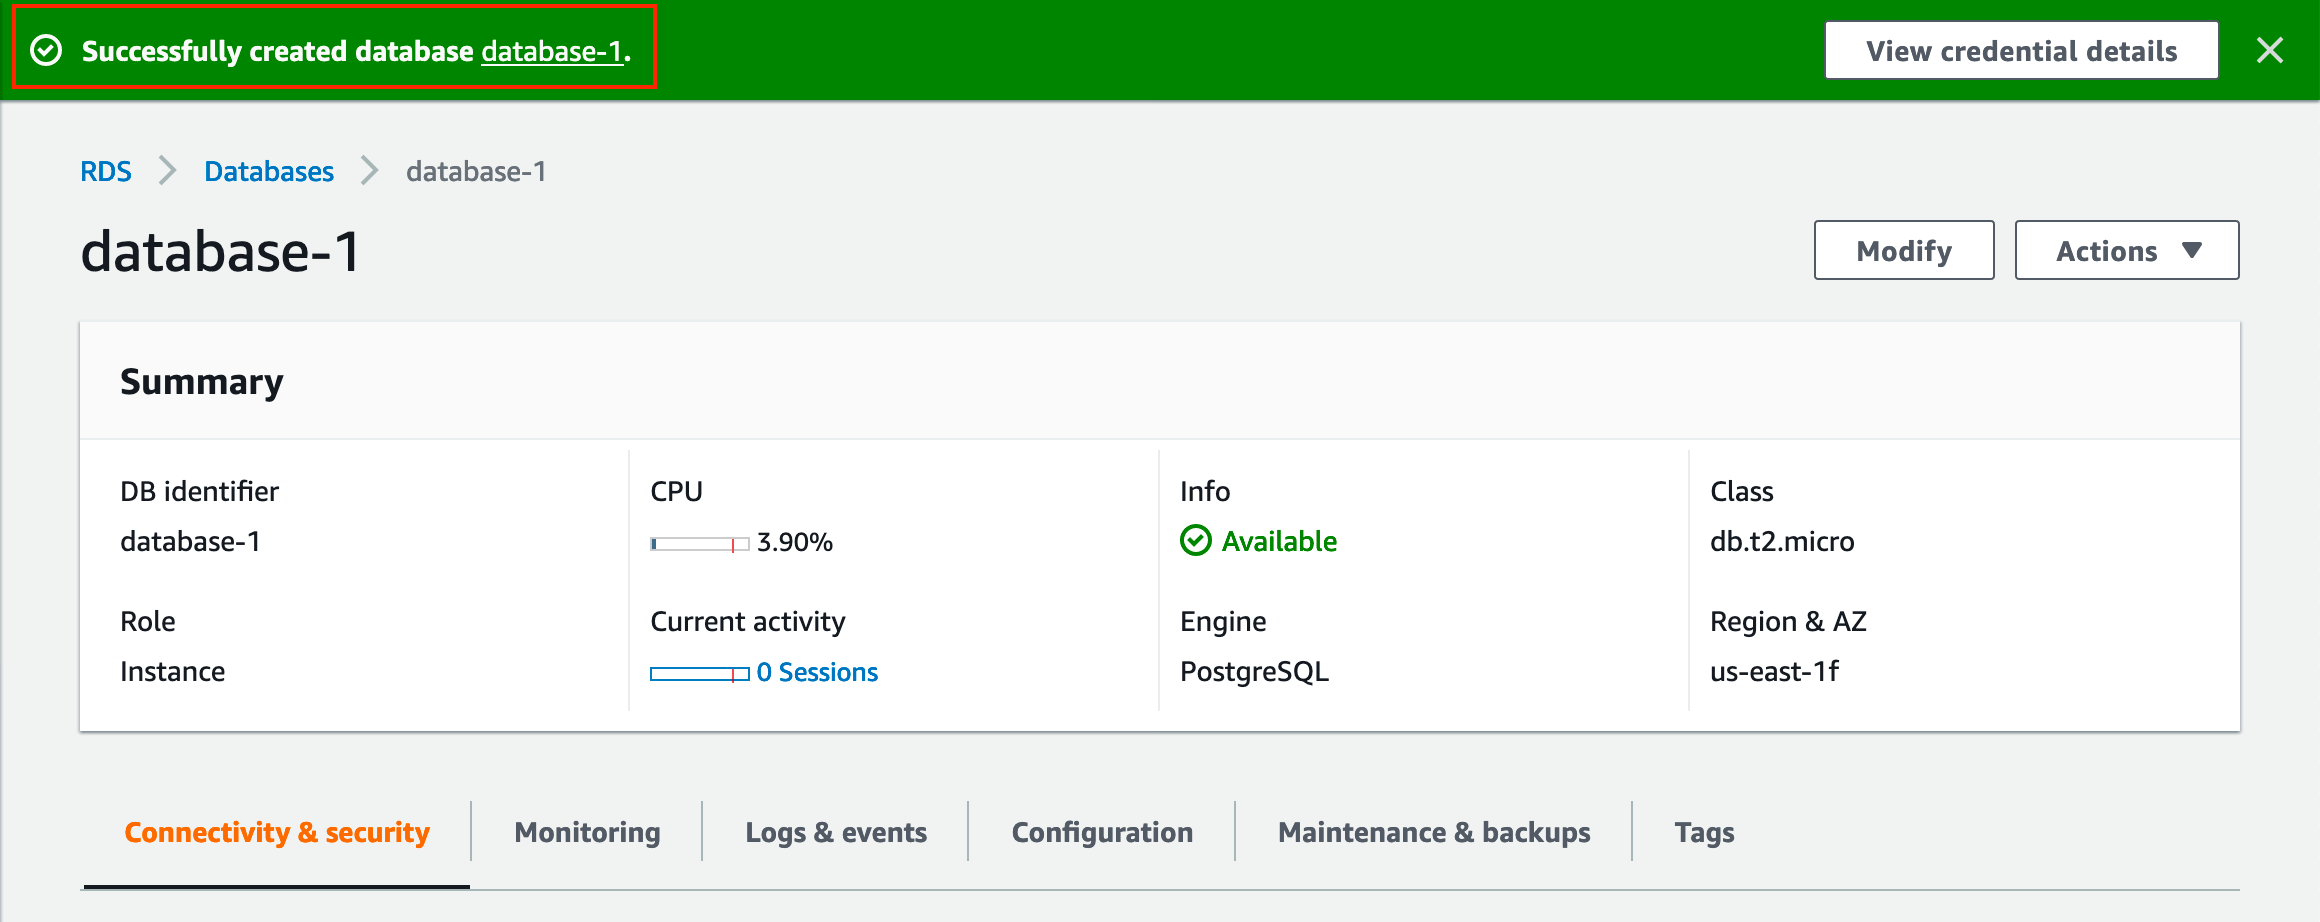
#15. You will see this message once your database is ready for action.


Please comment if you have any doubt. Like our Facebook page
 

Read more

AWS MySQL RDS Database Creation using AWS CLI
How to Create MySQL Database with AWS RDS
How to connect to AWS MySQL / MariaDB RDS or EC2 database from MySQL WorkBench

How to Become Oracle apps DBA?
What does DBA mean?
150 Oracle DBA Interview Questions
Top 5 Future Technologies for Database Administrators (DBA) to learn in 2020
Top 5 Software Technology Trends in 2020 List