How to Install and create AWS EC2 Instance using Terraform
In this article, we are going to see how to install Terraform and create an AWS EC2 machine. We will see detailed steps on how you can install Terraform on centos or RHEL Linux. You can easily get terraform binaries from the Terraform online software repository. Using a few commands you can get a fully running terraform command-line interface (CLI).
What is Terraform?
Terraform is a CLI utility application to provision, version and backup cloud infrastructure. Using Terraform modules you can create cloud services on AWS (Amazon Web Services), Microsoft Azure, Google Cloud (GCP), IBM Cloud and Alibaba Cloud. You can also call it infrastructure as Code means using code you can create and manage the entire cloud data center. I see one biggest advantage when you have to create multiple infrastructure services in different services provider platforms or in the same close platform. You can automate whole cloud implementation by Terraform and once your task or project is done you can destroy it. And again rebuilt according to the business or application need.
1#. Create a directory where you want to install the terraform
[root@thedbadmin ~]# cat /etc/redhat-release
CentOS Linux release 8.1.1911 (Core)
[root@thedbadmin ~]#

cd /opt
mkdir terraform
cd terraform/
chmod 777 terraform/
2#. Pull the terraform installation zip file from online repository. And create an environment variable file to run terraform.
wget https://releases.hashicorp.com/terraform/0.12.24/terraform_0.12.24_linux_amd64.zip

chmod 777 terraform_0.12.24_linux_amd64.zip
unzip terraform_0.12.24_linux_amd64.zip
echo "export PATH="$PATH:/opt/terraform"" >> profile_terraform.sh

chmod +x profile_terraform.sh
./profile_terraform.sh
3#. Check if its working fine using the version command
[root@thedbadmin terraform]# terraform --version
Terraform v0.12.24
How to create AWS Ec2 from Terraform
4#. Add your AWS_ACCESS_KEY_ID and AWS_SECRET_ACCESS_KEY into environment variable file (profile_terraform.sh)
echo "export AWS_ACCESS_KEY_ID=(your access key id) " >> /opt/terraform/profile_terraform.sh
echo "export AWS_SECRET_ACCESS_KEY=(your secret access key)" >> /opt/terraform/profile_terraform.sh
5#. Create provider.tf which will hold provider information
vim provider.tf
#---Content of provider.tf
provider "aws" {
  profile    = "default"
  region     = "us-east-1"
}

[root@thedbadmin terraform]# cat provider.tf
provider "aws" {
  profile    = "default"
  region     = "us-east-1"
}
6#. Create a create_ec2.tf which will hold the code for EC2 machine creation in AWS cloud
#---Content of create_ec2.tf
resource "aws_instance" "thedbadmin_test" {
  ami           = "ami-0fc61db8544a617ed"
  instance_type = "t2.micro"
}
#7. Now you have to Initialize the terraform by running ‘terraform init’. It will check your provider.tf file and based on your cloud provider it will download the modules and plugin.
[root@thedbadmin terraform]# terraform init

Initializing the backend...

Initializing provider plugins...
- Checking for available provider plugins...
- Downloading plugin for provider "aws" (hashicorp/aws) 2.55.0...

The following providers do not have any version constraints in configuration,
so the latest version was installed.

To prevent automatic upgrades to new major versions that may contain breaking
changes, it is recommended to add version = "..." constraints to the
corresponding provider blocks in configuration, with the constraint strings
suggested below.

* provider.aws: version = "~> 2.55"

Terraform has been successfully initialized!

You may now begin working with Terraform. Try running "terraform plan" to see
any changes that are required for your infrastructure. All Terraform commands
should now work.

If you ever set or change modules or backend configuration for Terraform,
rerun this command to reinitialize your working directory. If you forget, other
commands will detect it and remind you to do so if necessary.
#8. Now let’s run plan. In the planning phase, it is going to show you the detailed plan of execution of service creation code and their sequences. You can to review it and if all the things look good you can go for the next step.
[root@thedbadmin terraform]# terraform plan
Refreshing Terraform state in-memory prior to plan...
The refreshed state will be used to calculate this plan, but will not be
persisted to local or remote state storage.


------------------------------------------------------------------------

An execution plan has been generated and is shown below.
Resource actions are indicated with the following symbols:
  + create

Terraform will perform the following actions:

  # aws_instance.thedbadmin_test will be created
  + resource "aws_instance" "thedbadmin_test" {
      + ami                          = "ami-0fc61db8544a617ed"
      + arn                          = (known after apply)
      + associate_public_ip_address  = (known after apply)
      + availability_zone            = (known after apply)
      + cpu_core_count               = (known after apply)
      + cpu_threads_per_core         = (known after apply)
      + get_password_data            = false
      + host_id                      = (known after apply)
      + id                           = (known after apply)
      + instance_state               = (known after apply)
      + instance_type                = "t2.micro"
      + ipv6_address_count           = (known after apply)
      + ipv6_addresses               = (known after apply)
      + key_name                     = (known after apply)
      + network_interface_id         = (known after apply)
      + password_data                = (known after apply)
      + placement_group              = (known after apply)
      + primary_network_interface_id = (known after apply)
      + private_dns                  = (known after apply)
      + private_ip                   = (known after apply)
      + public_dns                   = (known after apply)
      + public_ip                    = (known after apply)
      + security_groups              = (known after apply)
      + source_dest_check            = true
      + subnet_id                    = (known after apply)
      + tenancy                      = (known after apply)
      + volume_tags                  = (known after apply)
      + vpc_security_group_ids       = (known after apply)

      + ebs_block_device {
          + delete_on_termination = (known after apply)
          + device_name           = (known after apply)
          + encrypted             = (known after apply)
          + iops                  = (known after apply)
          + kms_key_id            = (known after apply)
          + snapshot_id           = (known after apply)
          + volume_id             = (known after apply)
          + volume_size           = (known after apply)
          + volume_type           = (known after apply)
        }

      + ephemeral_block_device {
          + device_name  = (known after apply)
          + no_device    = (known after apply)
          + virtual_name = (known after apply)
        }

      + metadata_options {
          + http_endpoint               = (known after apply)
          + http_put_response_hop_limit = (known after apply)
          + http_tokens                 = (known after apply)
        }

      + network_interface {
          + delete_on_termination = (known after apply)
          + device_index          = (known after apply)
          + network_interface_id  = (known after apply)
        }

      + root_block_device {
          + delete_on_termination = (known after apply)
          + encrypted             = (known after apply)
          + iops                  = (known after apply)
          + kms_key_id            = (known after apply)
          + volume_id             = (known after apply)
          + volume_size           = (known after apply)
          + volume_type           = (known after apply)
        }
    }

Plan: 1 to add, 0 to change, 0 to destroy.

------------------------------------------------------------------------

Note: You didn't specify an "-out" parameter to save this plan, so Terraform
can't guarantee that exactly these actions will be performed if
"terraform apply" is subsequently run.
#9. Now you can apply the code and it will create the EC2 machine on AWS cloud
terraform apply
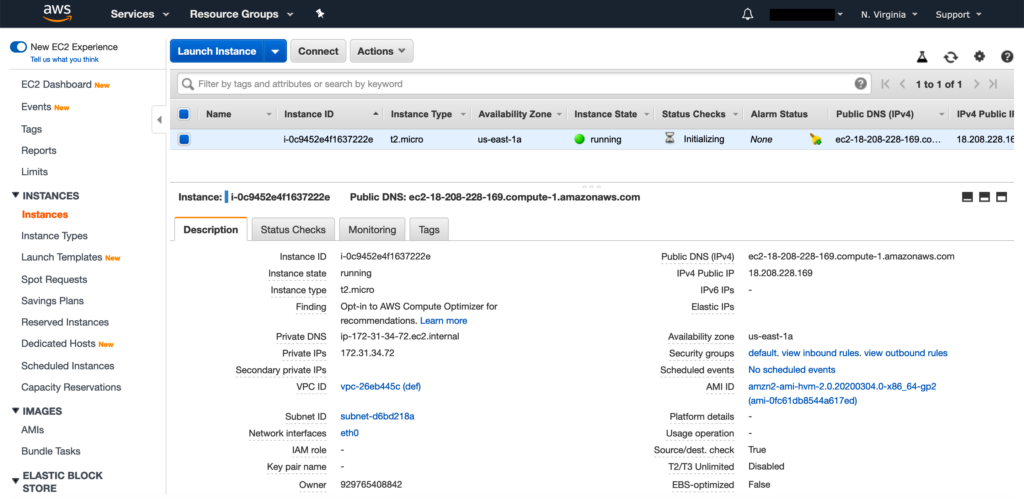
Once terraform apply executed successfully
You will see an AWS ec2 machine started running on the AWS console.
If you like to connect to this machine from putty see my post. in this post, you will see detailed steps for connecting AWS ec2 machine from putty or any command line a utilities.
You can also check the machine details from ‘terraform show’
[root@thedbadmin terraform]# terraform show
# aws_instance.thedbadmin_test:
resource "aws_instance" "thedbadmin_test" {
    ami                          = "ami-0fc61db8544a617ed"
    arn                          = "arn:aws:ec2:us-east-1:929765408842:instance/i-0c9452e4f1637222e"
    associate_public_ip_address  = true
    availability_zone            = "us-east-1a"
    cpu_core_count               = 1
    cpu_threads_per_core         = 1
    disable_api_termination      = false
    ebs_optimized                = false
    get_password_data            = false
    hibernation                  = false
    id                           = "i-0c9452e4f1637222e"
    instance_state               = "running"
    instance_type                = "t2.micro"
    ipv6_address_count           = 0
    ipv6_addresses               = []
    monitoring                   = false
    primary_network_interface_id = "eni-04e6b878e96c21811"
    private_dns                  = "ip-172-31-34-72.ec2.internal"
    private_ip                   = "172.31.34.72"
    public_dns                   = "ec2-18-208-228-169.compute-1.amazonaws.com"
    public_ip                    = "18.208.228.169"
    security_groups              = [
        "default",
    ]
    source_dest_check            = true
    subnet_id                    = "subnet-d6bd218a"
    tenancy                      = "default"
    volume_tags                  = {}
    vpc_security_group_ids       = [
        "sg-4c77dd0c",
    ]

    credit_specification {
        cpu_credits = "standard"
    }

    metadata_options {
        http_endpoint               = "enabled"
        http_put_response_hop_limit = 1
        http_tokens                 = "optional"
    }

    root_block_device {
        delete_on_termination = true
        encrypted             = false
        iops                  = 100
        volume_id             = "vol-04d551e12fe408c27"
        volume_size           = 8
        volume_type           = "gp2"
    }
}
How to Terminate or Delete EC2 machine from Terraform
Using terraform destroy command you can delete the AWS service or infrastructure. Be extra careful if you are deleting any realtime services or EC2 machine. Add proper snapshot or volume preserve option before deleting it.
[root@thedbadmin terraform]# terraform destroy
aws_instance.thedbadmin_test: Refreshing state... [id=i-0c9452e4f1637222e]

An execution plan has been generated and is shown below.
Resource actions are indicated with the following symbols:
  - destroy

Terraform will perform the following actions:

  # aws_instance.thedbadmin_test will be destroyed
  - resource "aws_instance" "thedbadmin_test" {
      - ami                          = "ami-0fc61db8544a617ed" -> null
      - arn                          = "arn:aws:ec2:us-east-1:929765408842:instance/i-0c9452e4f1637222e" -> null
      - associate_public_ip_address  = true -> null
      - availability_zone            = "us-east-1a" -> null
      - cpu_core_count               = 1 -> null
      - cpu_threads_per_core         = 1 -> null
      - disable_api_termination      = false -> null
      - ebs_optimized                = false -> null
      - get_password_data            = false -> null
      - hibernation                  = false -> null
      - id                           = "i-0c9452e4f1637222e" -> null
      - instance_state               = "running" -> null
      - instance_type                = "t2.micro" -> null
      - ipv6_address_count           = 0 -> null
      - ipv6_addresses               = [] -> null
      - monitoring                   = false -> null
      - primary_network_interface_id = "eni-04e6b878e96c21811" -> null
      - private_dns                  = "ip-172-31-34-72.ec2.internal" -> null
      - private_ip                   = "172.31.34.72" -> null
      - public_dns                   = "ec2-18-208-228-169.compute-1.amazonaws.com" -> null
      - public_ip                    = "18.208.228.169" -> null
      - security_groups              = [
          - "default",
        ] -> null
      - source_dest_check            = true -> null
      - subnet_id                    = "subnet-d6bd218a" -> null
      - tags                         = {} -> null
      - tenancy                      = "default" -> null
      - volume_tags                  = {} -> null
      - vpc_security_group_ids       = [
          - "sg-4c77dd0c",
        ] -> null

      - credit_specification {
          - cpu_credits = "standard" -> null
        }

      - metadata_options {
          - http_endpoint               = "enabled" -> null
          - http_put_response_hop_limit = 1 -> null
          - http_tokens                 = "optional" -> null
        }

      - root_block_device {
          - delete_on_termination = true -> null
          - encrypted             = false -> null
          - iops                  = 100 -> null
          - volume_id             = "vol-04d551e12fe408c27" -> null
          - volume_size           = 8 -> null
          - volume_type           = "gp2" -> null
        }
    }

Plan: 0 to add, 0 to change, 1 to destroy.

Do you really want to destroy all resources?
  Terraform will destroy all your managed infrastructure, as shown above.
  There is no undo. Only 'yes' will be accepted to confirm.

  Enter a value: yes

aws_instance.thedbadmin_test: Destroying... [id=i-0c9452e4f1637222e]
aws_instance.thedbadmin_test: Still destroying... [id=i-0c9452e4f1637222e, 10s elapsed]
aws_instance.thedbadmin_test: Still destroying... [id=i-0c9452e4f1637222e, 20s elapsed]
aws_instance.thedbadmin_test: Still destroying... [id=i-0c9452e4f1637222e, 30s elapsed]
aws_instance.thedbadmin_test: Destruction complete after 36s

Destroy complete! Resources: 1 destroyed.
[root@thedbadmin terraform]# terraform show

[root@thedbadmin terraform]#
Once the above command is executed successfully you will see that AWS will start terminating your EC2 instance.

Terraform Command
[root@thedbadmin terraform]# terraform
Usage: terraform [-version] [-help] <command> [args]

The available commands for execution are listed below.
The most common, useful commands are shown first, followed by
less common or more advanced commands. If you're just getting
started with Terraform, stick with the common commands. For the
other commands, please read the help and docs before usage.

Common commands:
    apply              Builds or changes infrastructure
    console            Interactive console for Terraform interpolations
    destroy            Destroy Terraform-managed infrastructure
    env                Workspace management
    fmt                Rewrites config files to canonical format
    get                Download and install modules for the configuration
    graph              Create a visual graph of Terraform resources
    import             Import existing infrastructure into Terraform
    init               Initialize a Terraform working directory
    output             Read an output from a state file
    plan               Generate and show an execution plan
    providers          Prints a tree of the providers used in the configuration
    refresh            Update local state file against real resources
    show               Inspect Terraform state or plan
    taint              Manually mark a resource for recreation
    untaint            Manually unmark a resource as tainted
    validate           Validates the Terraform files
    version            Prints the Terraform version
    workspace          Workspace management

All other commands:
    0.12upgrade        Rewrites pre-0.12 module source code for v0.12
    debug              Debug output management (experimental)
    force-unlock       Manually unlock the terraform state
    push               Obsolete command for Terraform Enterprise legacy (v1)
    state              Advanced state management
I hope this article will useful and step by step.
Please like our FaceBook page and subscribe to the newsletter for future post and updates.
Read more
AWS MySQL RDS Database Creation using AWS CLI
How to Create MySQL Database with AWS RDS
How to connect to AWS MySQL / MariaDB RDS or EC2 database from MySQL WorkBench
How to Become Oracle apps DBA?
What does DBA mean?
150 Oracle DBA Interview Questions
Top 5 Future Technologies for Database Administrators (DBA) to learn in 2020
Top 5 Software Technology Trends in 2020 List