fbpx

How to Fix Pg_ctl command not found

Sometimes after a fresh PostgreSQL install if we want to start or stop from PostgreSQL rather than controlling the PostgreSQL instance start and stop from the root. And when we run the pg_ctl from the command prompt as a PostgreSQL Linux user we see the error bash: pg_ctl: command not found… 

In this article, lets learn how to fix it

As PostgreSQL check your pg base directory 


And now add this PostgreSQL to the Linux path so that it’s always available. I would recommand to create a postgresql env. file so that it more easy to handle rather than messing with other systems runing on linux operating system.

				
					--Step 1 
-bash-4.2$ echo $PGDATA
/var/lib/pgsql/10/data

--Step 2
-bash-4.2$ echo "PATH=/usr/pgsql-10/bin:$PATH">>~/.postgre_10.profile

--Step 3
chmod 777 .postgre_10.profile

--Step 4 
. .postgre_10.profile

--Step 5
Check pg_ctl now

-bash-4.2$ pg_ctl --version
pg_ctl (PostgreSQL) 10.17
-bash-4.2$


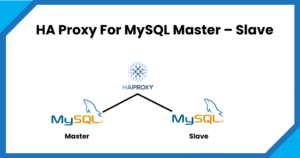
HA Proxy For MySQL Master – Slave

There are scenarios where we have to provide the high ability to MySQL database instances and we use the Master and Slave replication method of MySQL database.

In the same case to segregate the Read and Write database traffic. We widly use HA- Proxy. It is a feature rich open source Load blancing tool with many unique features like reverse proxy but in out case we are going to use it only for Hight aviliblity purpose.

				
					root@haproxy01:~# haproxy -v
HA-Proxy version 2.0.13-2ubuntu0.3 2021/08/27 - https://haproxy.org/


How to Install it?

You simply use yum or apt commands to install it

				
					sudo apt install -y haproxy


Check  the version 


Install Mysql Client for HA Proxy Node to communicate with mysql master and slave databases.


					apt-get install -y mysql-client
cd /etc/haproxy/
cp haproxy.cfg haproxy.cfg_org
vim haproxy.cfg


					root@haproxy01:~# cat /etc/haproxy/haproxy.cfg
global
	log 127.0.0.1 local0 notice
        log /dev/log    local0
  	user haproxy
	group haproxy

	# Default SSL material locations

defaults
	log global
	mode tcp
        option tcplog
	retries 2
	timeout client 30m
	timeout connect 4s
    	timeout server 30m
	timeout check 5s

listen stats
        mode http
        bind *:9201
        stats enable
        stats uri /stats
        stats realm Strictly\ Private
        stats auth admin:admin

listen mysql-cluster
       bind *:3306
       mode tcp
       option mysql-check user haproxy_user
       balance roundrobin
       server master 192.168.56.205:3306 check
       server slave1 192.168.56.206:3306 check

listen mysql-cluster1
    bind 192.168.1.208:3306
    mode tcp
    option mysql-check user haproxy_user
    balance roundrobin
    server mysql-1 192.168.1.205:3306 check
    server mysql-2 192.168.1.206:3306 check


Create HA proxy user on mysql01/205 on primary node

				
					GRANT ALL PRIVILEGES ON *.* TO 'haproxy_root'@'%' IDENTIFIED BY 'Oracle@123' WITH GRANT OPTION;

flush privileges;


Test the configuration and it should start without error & Target should come up on GUI

				
					haproxy -f /etc/haproxy/haproxy.cfg -db

systemctl restart haproxy.service


Check HA proxy GUI and see all the MySQL target is up and running fine using HA Proxy Admin link:

HA Proxy Link Structure:

http://<localhost or IP/HostName/stats

http://192.168.1.208:9201/stats

Default Credentials : 

UserName : admin

Password: admin

Read More...

Running MongoDB on Docker Compose

In this article, we will discuss how DBA can run a MongoDB instance using docker-compose. It’s very easy and quite flexible to handle. According to my opinion docker-compose removes all the installation and configuration pain when you need a test instance immediately. In a non-production environment for proof of concepts (POC) environment, you can easily use MongoDB on docker-compose.


High-Level Steps for Installation & Configuration

  • Install Docker 
  • Install Docker compose
  • Take the docker-compose code with MongoDB 
  • Run the docker-compose 
  • Connect to MongoDB Database
  • Connect From MongoDB from Docker bash

Prerequisites

mkdir -p /opt/docker_com_repo

cd /opt/docker_com_repo

vi docker-compose.yml

Copy Below docker compose code for MongoDB and paste in side the docker-compose.yml


IMP: Remove all the comments with “< abc>” From compose code

mkdir -p  /opt/mongo/datafiles/db

mkdir  -p /opt/mongo/configfiles

Docker Compose Code

version: ‘3.3’   
services:
mongodb_container:
container_name: mongodb4.0                                                                 
image: mongo:4.0                                                                                          < Container Image>
environment:
MONGO_INITDB_DATABASE: thedbadmin                                             
MONGO_INITDB_ROOT_USERNAME: root                                                < Database Admin username>
MONGO_INITDB_ROOT_PASSWORD: oracle                                          < Database Admin Password>
ports:
– 27017:27017                                                                                                     
volumes:
– /opt/mongo/datafiles/db:/data                                                     < Persistent Volume for Data files>
– /opt/mongo/configfiles:/etc/mongod                                          < Persistent volume for MongoDB configuration file>

Ruing Docker Compose

cd /opt/docker_com_repo

docker-compose up -d

Check if the MongoDB instance started?

[root@master01 mongodb]# docker-compose ps
Name Command State Ports
———————————————————————————————–
mongodb4.0 docker-entrypoint.sh mongod Up 0.0.0.0:27017->27017/tcp,:::27017->27017/tcp

Test Database connection

[root@master01 mongodb]# telnet localhost 27017
Trying ::1…
Connected to localhost.
Escape character is ‘^]’.

if looks good than go for the next step or stop the Linux firewall 

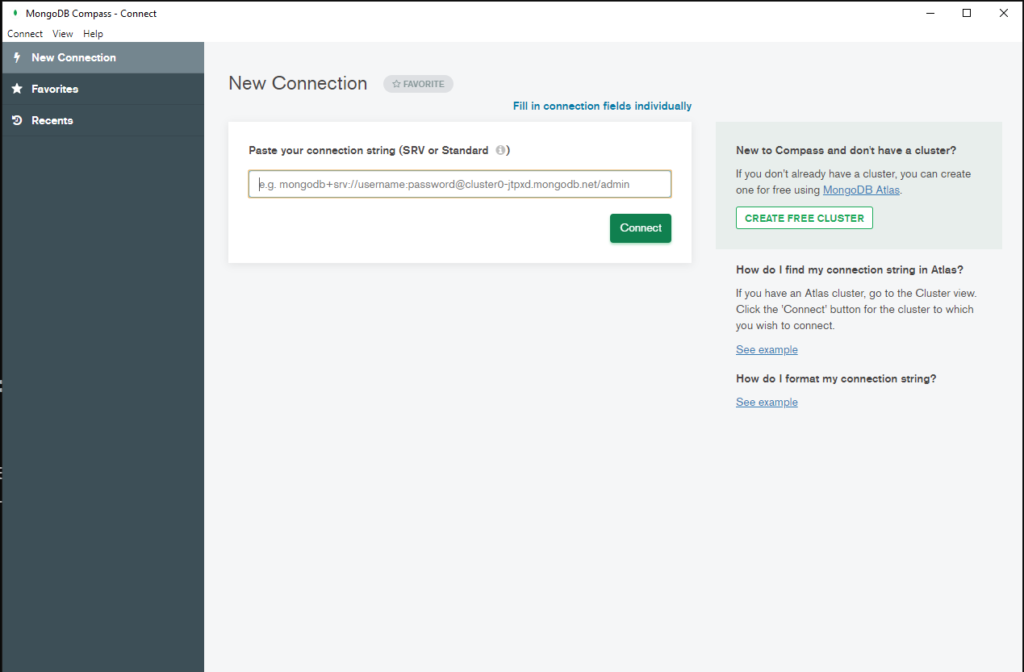
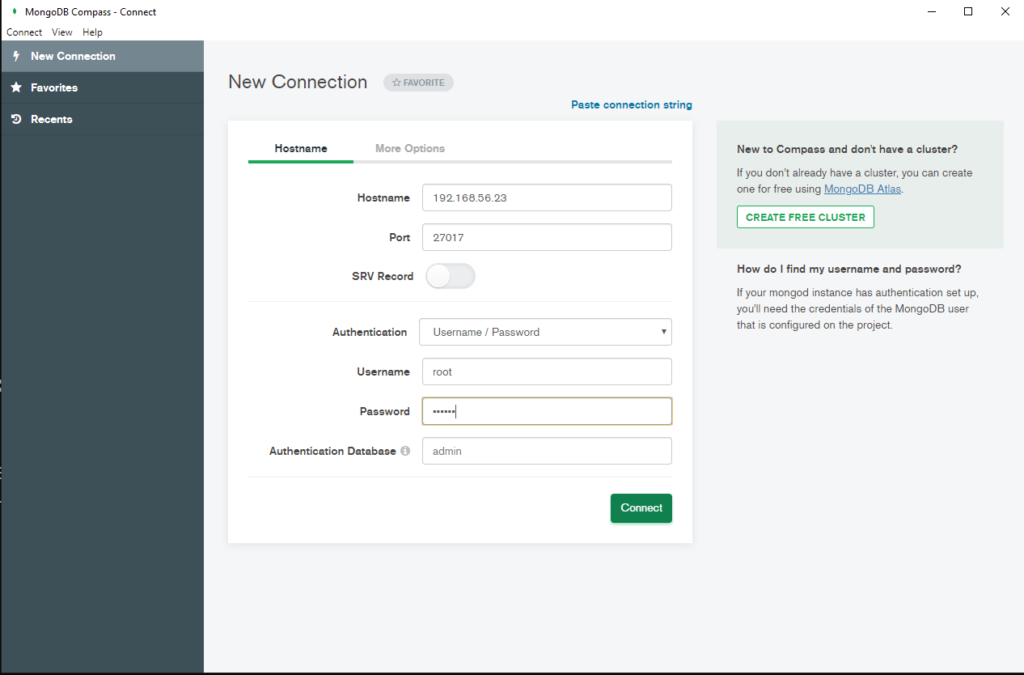
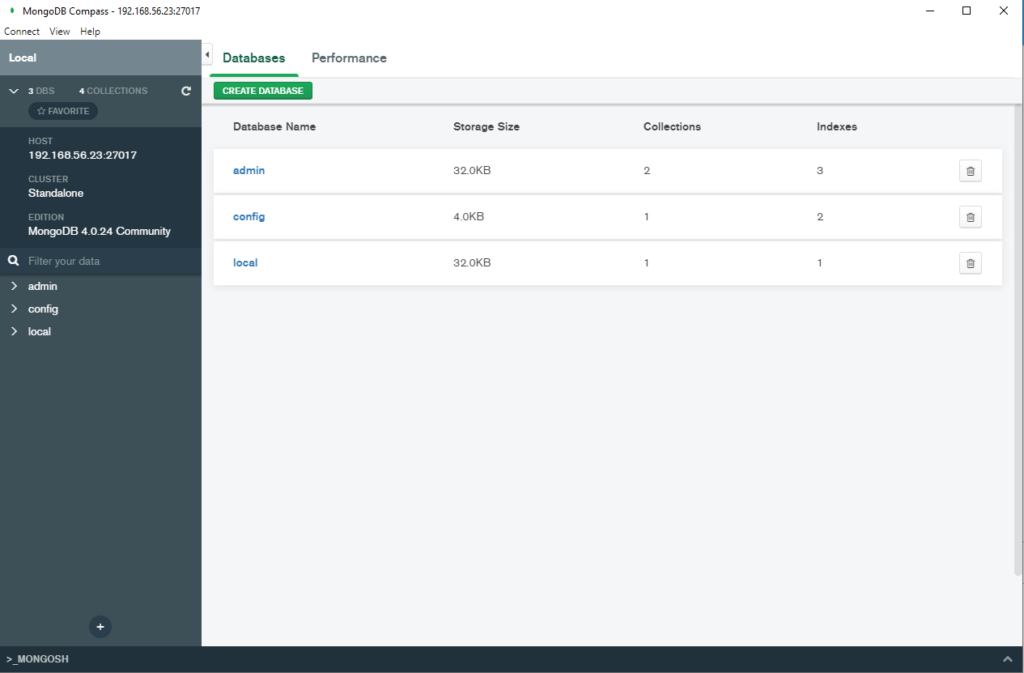
Open MongoDB compass and connect to Database. Follow the screenshots 

Click on “Fill in connection Fields individually

Change the hostname as per your server or machine

You can hit Create database and start using MongoDB

Connect MongoDB from the command Line 

[root@master01 mongodb]# docker exec -it mongodb4.0 bash

root@58054f03c382:/# mongo -u root -p
MongoDB shell version v4.0.24
Enter password:
connecting to: mongodb://127.0.0.1:27017/?gssapiServiceName=mongodb
Implicit session: session { “id” : UUID(“0d7bb9a1-9549-491c-89c3-dfc9caab7547”) }
MongoDB server version: 4.0.24
Server has startup warnings:
2021-10-02T09:05:13.292+0000 I CONTROL [initandlisten]
2021-10-02T09:05:13.293+0000 I CONTROL [initandlisten] ** WARNING: /sys/kernel/mm/transparent_hugepage/enabled is ‘always’.
2021-10-02T09:05:13.293+0000 I CONTROL [initandlisten] ** We suggest setting it to ‘never’
2021-10-02T09:05:13.293+0000 I CONTROL [initandlisten]
2021-10-02T09:05:13.293+0000 I CONTROL [initandlisten] ** WARNING: /sys/kernel/mm/transparent_hugepage/defrag is ‘always’.
2021-10-02T09:05:13.293+0000 I CONTROL [initandlisten] ** We suggest setting it to ‘never’
2021-10-02T09:05:13.293+0000 I CONTROL [initandlisten]

Enable MongoDB’s free cloud-based monitoring service, which will then receive and display
metrics about your deployment (disk utilization, CPU, operation statistics, etc).

The monitoring data will be available on a MongoDB website with a unique URL accessible to you
and anyone you share the URL with. MongoDB may use this information to make product
improvements and to suggest MongoDB products and deployment options to you.

To enable free monitoring, run the following command: db.enableFreeMonitoring()
To permanently disable this reminder, run the following command: db.disableFreeMonitoring()

> show databases;
admin 0.000GB
config 0.000GB
local 0.000GB

Stay Tuned For latest Database, Cloud & Technology Trends

Read More >>

How to Fix Cannot open your terminal ‘/dev/pts/2’ – please check

Normally we see a common error when we switch or sudo to a user to run the screen session and it gets closes with the error ‘Cannot open your terminal ‘/dev/pts/2′ – please check’. fix it very tiny but it took a long for me to find so I thought I will share the quick fix and save our prices time.

Error:

[thedbadmin@testdb01 ~]$ screen -x 12991.screen_testCannot open your terminal ‘/dev/pts/0’ – please check.[thedbadmin@testdb01 ~]$

Step 1: logout from the user that you have logged in.

Step 2: log as your user or from where you want to run screen and just give full privileged to /dev/pts/* 

Fix : 
$ chmod 777 /dev/pts/*


Note: if you get any warning or error after executing the above command,  just ignore it safely.

Now you can start the screen again hopefully you won’t see that error again

Happy programming !!!

Apache Tomcat: java.net.BindException: Permission denied (Bind failed) :443

How to fix error: Apache tomcat : java.net.BindException: Permission denied (Bind failed) <null>:443


Full Error:

SEVERE: Failed to initialize end point associated with ProtocolHandler ["http-bio-4443"]
java.net.BindException: Permission denied (Bind failed) <null>:4443
	at org.apache.tomcat.util.net.JIoEndpoint.bind(JIoEndpoint.java:413)
	at org.apache.tomcat.util.net.AbstractEndpoint.init(AbstractEndpoint.java:715)
	at org.apache.coyote.AbstractProtocol.init(AbstractProtocol.java:452)
	at org.apache.coyote.http11.AbstractHttp11JsseProtocol.init(AbstractHttp11JsseProtocol.java:119)
	at org.apache.catalina.connector.Connector.initInternal(Connector.java:978)
	at org.apache.catalina.util.LifecycleBase.init(LifecycleBase.java:102)
	at org.apache.catalina.core.StandardService.initInternal(StandardService.java:560)
	at org.apache.catalina.util.LifecycleBase.init(LifecycleBase.java:102)
	at org.apache.catalina.core.StandardServer.initInternal(StandardServer.java:840)
	at org.apache.catalina.util.LifecycleBase.init(LifecycleBase.java:102)
	at org.apache.catalina.startup.Catalina.load(Catalina.java:642)
	at org.apache.catalina.startup.Catalina.load(Catalina.java:667)
	at sun.reflect.NativeMethodAccessorImpl.invoke0(Native Method)
	at sun.reflect.NativeMethodAccessorImpl.invoke(NativeMethodAccessorImpl.java:62)
	at sun.reflect.DelegatingMethodAccessorImpl.invoke(DelegatingMethodAccessorImpl.java:43)
	at java.lang.reflect.Method.invoke(Method.java:498)
	at org.apache.catalina.startup.Bootstrap.load(Bootstrap.java:253)
	at org.apache.catalina.startup.Bootstrap.main(Bootstrap.java:427)
Caused by: java.net.BindException: Permission denied (Bind failed)
	at java.net.PlainSocketImpl.socketBind(Native Method)
	at java.net.AbstractPlainSocketImpl.bind(AbstractPlainSocketImpl.java:387)
	at java.net.ServerSocket.bind(ServerSocket.java:390)
	at java.net.ServerSocket.<init>(ServerSocket.java:252)
	at java.net.ServerSocket.<init>(ServerSocket.java:196)
	at javax.net.ssl.SSLServerSocket.<init>(SSLServerSocket.java:136)
	at sun.security.ssl.SSLServerSocketImpl.<init>(SSLServerSocketImpl.java:71)
	at sun.security.ssl.SSLServerSocketFactoryImpl.createServerSocket(SSLServerSocketFactoryImpl.java:80)
	at org.apache.tomcat.util.net.jsse.JSSESocketFactory.createSocket(JSSESocketFactory.java:256)
	at org.apache.tomcat.util.net.JIoEndpoint.bind(JIoEndpoint.java:400)
	... 17 more


Why, when, and where we get this error?


We get this issue while starting Apache tomcat on secure port 443. The error “java.net.BindException: Permission denied (Bind failed) :443 ” is visible in /usr/share/tomcat/logs/catalina.2016-12-02.log


How to fix it

This error occurs when your Linux firewall levels are set to ‘enforcing‘.To fix this error make it ‘permissive

  1. Check current firewall status using the command ‘getenforce
  2. Edit the file ‘vi /etc/selinux/config’ and make it ‘permissive’ from ‘enforcing’
    # This file controls the state of SELinux on the system.
    # SELINUX= can take one of these three values:
    #       enforcing - SELinux security policy is enforced.
    #       permissive - SELinux prints warnings instead of enforcing.
    #       disabled - No SELinux policy is loaded.
    SELINUX=permissive
    # SELINUXTYPE= can take one of these two values:
    #       targeted - Targeted processes are protected,
    #       mls - Multi Level Security protection.
    SELINUXTYPE=targeted
  3. Reboot the system using ‘reboot‘ as the root
  4. After reboot check, if tomcat is up with 443 port
    netstat -plan| grep 443
  5. And check the tomcat URL with ssl/https  (https://localhost:443)

Leave a comment if you find the article helpful.


Read More

How to fix ORA-28368: cannot auto-create wallet
AWS Services and their Azure alternatives 
How to Manage AWS S3 Bucket with AWS CLI

How to connect PostgreSQL Database from PgAdmin
How to create AWS rds PostgreSQL Database
Convert pem to ppk
How to Install PuTTy on Window
How to Install and create AWS EC2 Instance using Terraform
AWS MySQL RDS Database Creation using AWSCLI
How to Create MySQL Database with AWS RDS
How to connect to AWS MySQL / MariaDB RDS or EC2 database from MySQL WorkBench

 

How to Configure Oracle Transparent Data Encryption (TDE) on Standby Database

How to Configure Oracle Transparent Data  Encryption (TDE) on Standby Database


In this article, we will see how to enable Oracle Transparent Data  Encryption TDE on the Standby database with easy and simple steps. If we have Oracle Transparent Data  Encryption TDE enabled primary database standby database won’t be able to apply the logs. And it may possible that it could out of synchronization from the primary side.

I would recommend enabling Oracle Transparent Data Encryption TDE on standby along with the primary database. If you do it later you might see standby is out of synchronization with Primary database. Rebuilding a big database standby database is a complex and time-consuming task. In this way, you can enable Oracle Transparent Data Encryption TDE with few easy steps. Primary and standby could be TDE enabled in the same downtime window.

Oracle Transparent Data Encryption TDE is one of the ways in Oracle Advanced security to secure the database physical datafiles.


On Standby Database


[su_note note_color=”#0174be” text_color=”#ffffff” radius=”4″]TDE Prerequisites[/su_note]

Make sure OPtach 23315889 has been applied to oracle standby database oracle home

opatch lsinventory| grep 23315889


On Primary Database


1. Login to Primary database and get the wallet path.


SQL>select WRL_PARAMETER from v$encryption_wallet;

WRL_PARAMETER
--------------------------------------------------------------------------------
/u01/oracle/admin/wallet/testdb01/


2. Check the wallet key files.


ls -lrt /u01/oracle/admin/wallet/testdb01

-rw-------. 1 oracle oninstall 2093 Jun 9 06:59 ewallet.p12
-rw-------. 1 oracle oninstall 1928 Jun 9 07:24 cwallet.sso


3. Zip the keys and Copy the files to the standby server.


cd /u01/oracle/admin/wallet/testdb01
zip /tmp/walletkeys.zip *
scp /u01/oracle/admin/wallet/testdb01/*wallet.* 192.168.56.5:/tmp


On Standby Database


1. Go to the Standby data $TNS_ADMIN and add the wallet path.


cd $TNS_ADMIN
vim sqlnet.ora

--add following line

ENCRYPTION_WALLET_LOCATION = (SOURCE = (METHOD = FILE) (METHOD_DATA = (DIRECTORY = /u01/oracle/admin/$ORACLE_SID/wallet/)))
2. Make the directory


mkdir -p /u01/oracle/admin/$ORACLE_SID/wallet/

Note: $ORACLE_SID is your database Name


3. Copy the primary database key to standby wallet location.


cd /tmp
unzip walletkeys.zip
cp /tmp/*wallet*.* /opt/oracle/admin/$ORACLE_SID/wallet/wallet_tde


3. Stop Standby recovery the standby database.


sqlplus "/as sysdba"

SQL> alter database recover managed standby database cancel;

SQL> shutdown immediate


4. Start the standby database in read-only mode.


SQL> Startup;


5. Check wallet path it should be Open and Autologin mode.


SQL> select status,wallet_type from v$encription_wallet;

status wallet_type
--------------------------------
OPEN AUTOLOGIN


6. Prepare the tablespace datafile encryption script.


$ sqlplus / as sysdba
SQL>set heading off
SQL>set linesize 150
SQL>spool tablespace_datafiles_encrypt.sql
SQL>select 'alter database datafile ''' || file_name ||''' encrypt;' from dba_data_files where tablespace_name not in ('SYSTEM','SYSAUX','TEMP1','TEMP2','APPS_UNDOTS1');
SQL>exit


[su_box title=”IMP Note” box_color=”#fe2227″ title_color=”#101112″] Make sure you leave following table space database in encryption script ‘SYSTEM’, ‘SYSAUX’,’TEMP1′,’TEMP2′,’APPS_UNDOTS1′[/su_box]


7. Stop the Standby Database again.


SQL> Shutdown normal;


8. Start the database in mount mode.


SQL> startup mount


9. Run the database encryption script.


SQL> @tablespace_datafiles_encrypt.sql


10. Once Tablespace encrypt script is completed successfully Start the standby recovery.


SQL> alter database recover managed standby database disconnect;


20. Monitor standby log apply. If you see logs are applying properly on standby side. You are Done!
SQL> select process, status, thread#, sequence#, from v$managed_standby;

PROCESS STATUS THREAD# SEQUENCE#
------- ------------ ---------- ----------
MRP0 APPLYING_LOG 1 10293

Hope you will find this article helpful. in case if you have any questions ask me my comments.


Like our Facebook Page


Read More

How to fix ORA-28368: cannot auto-create wallet
AWS Services and their Azure alternatives 
How to Manage AWS S3 Bucket with AWS CLI

How to connect PostgreSQL Database from PgAdmin
How to create AWS rds PostgreSQL Database
Convert pem to ppk
How to Install PuTTy on Window
How to Install and create AWS EC2 Instance using Terraform
AWS MySQL RDS Database Creation using AWSCLI
How to Create MySQL Database with AWS RDS
How to connect to AWS MySQL / MariaDB RDS or EC2 database from MySQL WorkBench