Database
MySQL query output to csv
There are situations when we have to run the select queries on MySQL databases and redirect the output in .cav format. This is required when we have to share the data with the developer or send it to some ETL job for external tables. In addition, if you are running MySQL on AWS RDS you get limited options to get the MySQL query output to CSV. As an alternative, you can use the AWS S3 bucket but again it’s a complex and cost-involved way of getting MySQL query output to CSV. I am going to show you an easy alternative that will work on a normal Linux command prompt. Using this you can fetch a long SQL output in CSV from MySQL RDS or from on promises MySQL Database instance.
Step 1: log in to any jump host or bastion host
Step 2: if your SQL output is going to take a long time use screen
screen -S mysql2csv_date
Step 3 Run MySQL export batch command and sed Linux command
mysql -A -h testdb01.us-east-1.rds.amazonaws.com -u root -p --batch -e "select * from testdb01.table_x where date_created >='2021-07-01 00:00:00' AND LENGTH(emp_id) < 30 order by date_created;" | sed 's/\t/","/g;s/^/"/;s/$/"/;s/\n//g' > mysq2csv_output.csv
Step 4: once the command is completed you will see the output in .csv under the file mysq2csv_output.csv
Hope you like the article
References: https://dev.mysql.com/doc/refman/8.0/en/select-into.html
Read More
Take MySQL backup From Jenkins Job
How to fix ORA-28368: cannot auto-create wallet
AWS Services and their Azure alternatives
How to Manage AWS S3 Bucket with AWS CLI
How to connect PostgreSQL Database from PgAdmin
How to create AWS rds PostgreSQL Database
Convert pem to ppk
How to Install PuTTy on Window
How to Install and create AWS EC2 Instance using Terraform
AWS MySQL RDS Database Creation using AWSCLI
How to Create MySQL Database with AWS RDS
How to connect to AWS MySQL / MariaDB RDS or EC2 database from MySQL WorkBench
Take MySQL backup From Jenkins Job
Take MySQL Database Backup From Jenkins
In this post, we will explain and practically show how you can configure MySQL database backup using Jenkins jobs. in easy words, you will automate the MySQL database backup process from Jenkins GUI and MySQL dump command. Normally we use MySQL dump from CLI or using the windows option. In this case, just automate the MySQL dump triggering from a shell script which will be called by Jenkins job with parameter. MySQL dump needs few parameters to run just pass them by build with parameter option in jenkins.
1. Log to Jenkins default URL and port: http://192.168.56.21:8080/
If you want to install and setup Jenkins see this article
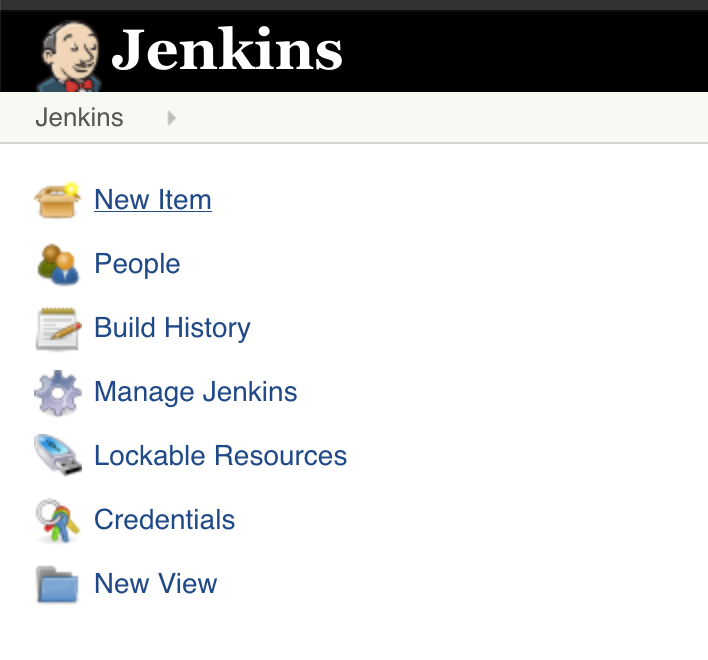
2. Go to New items
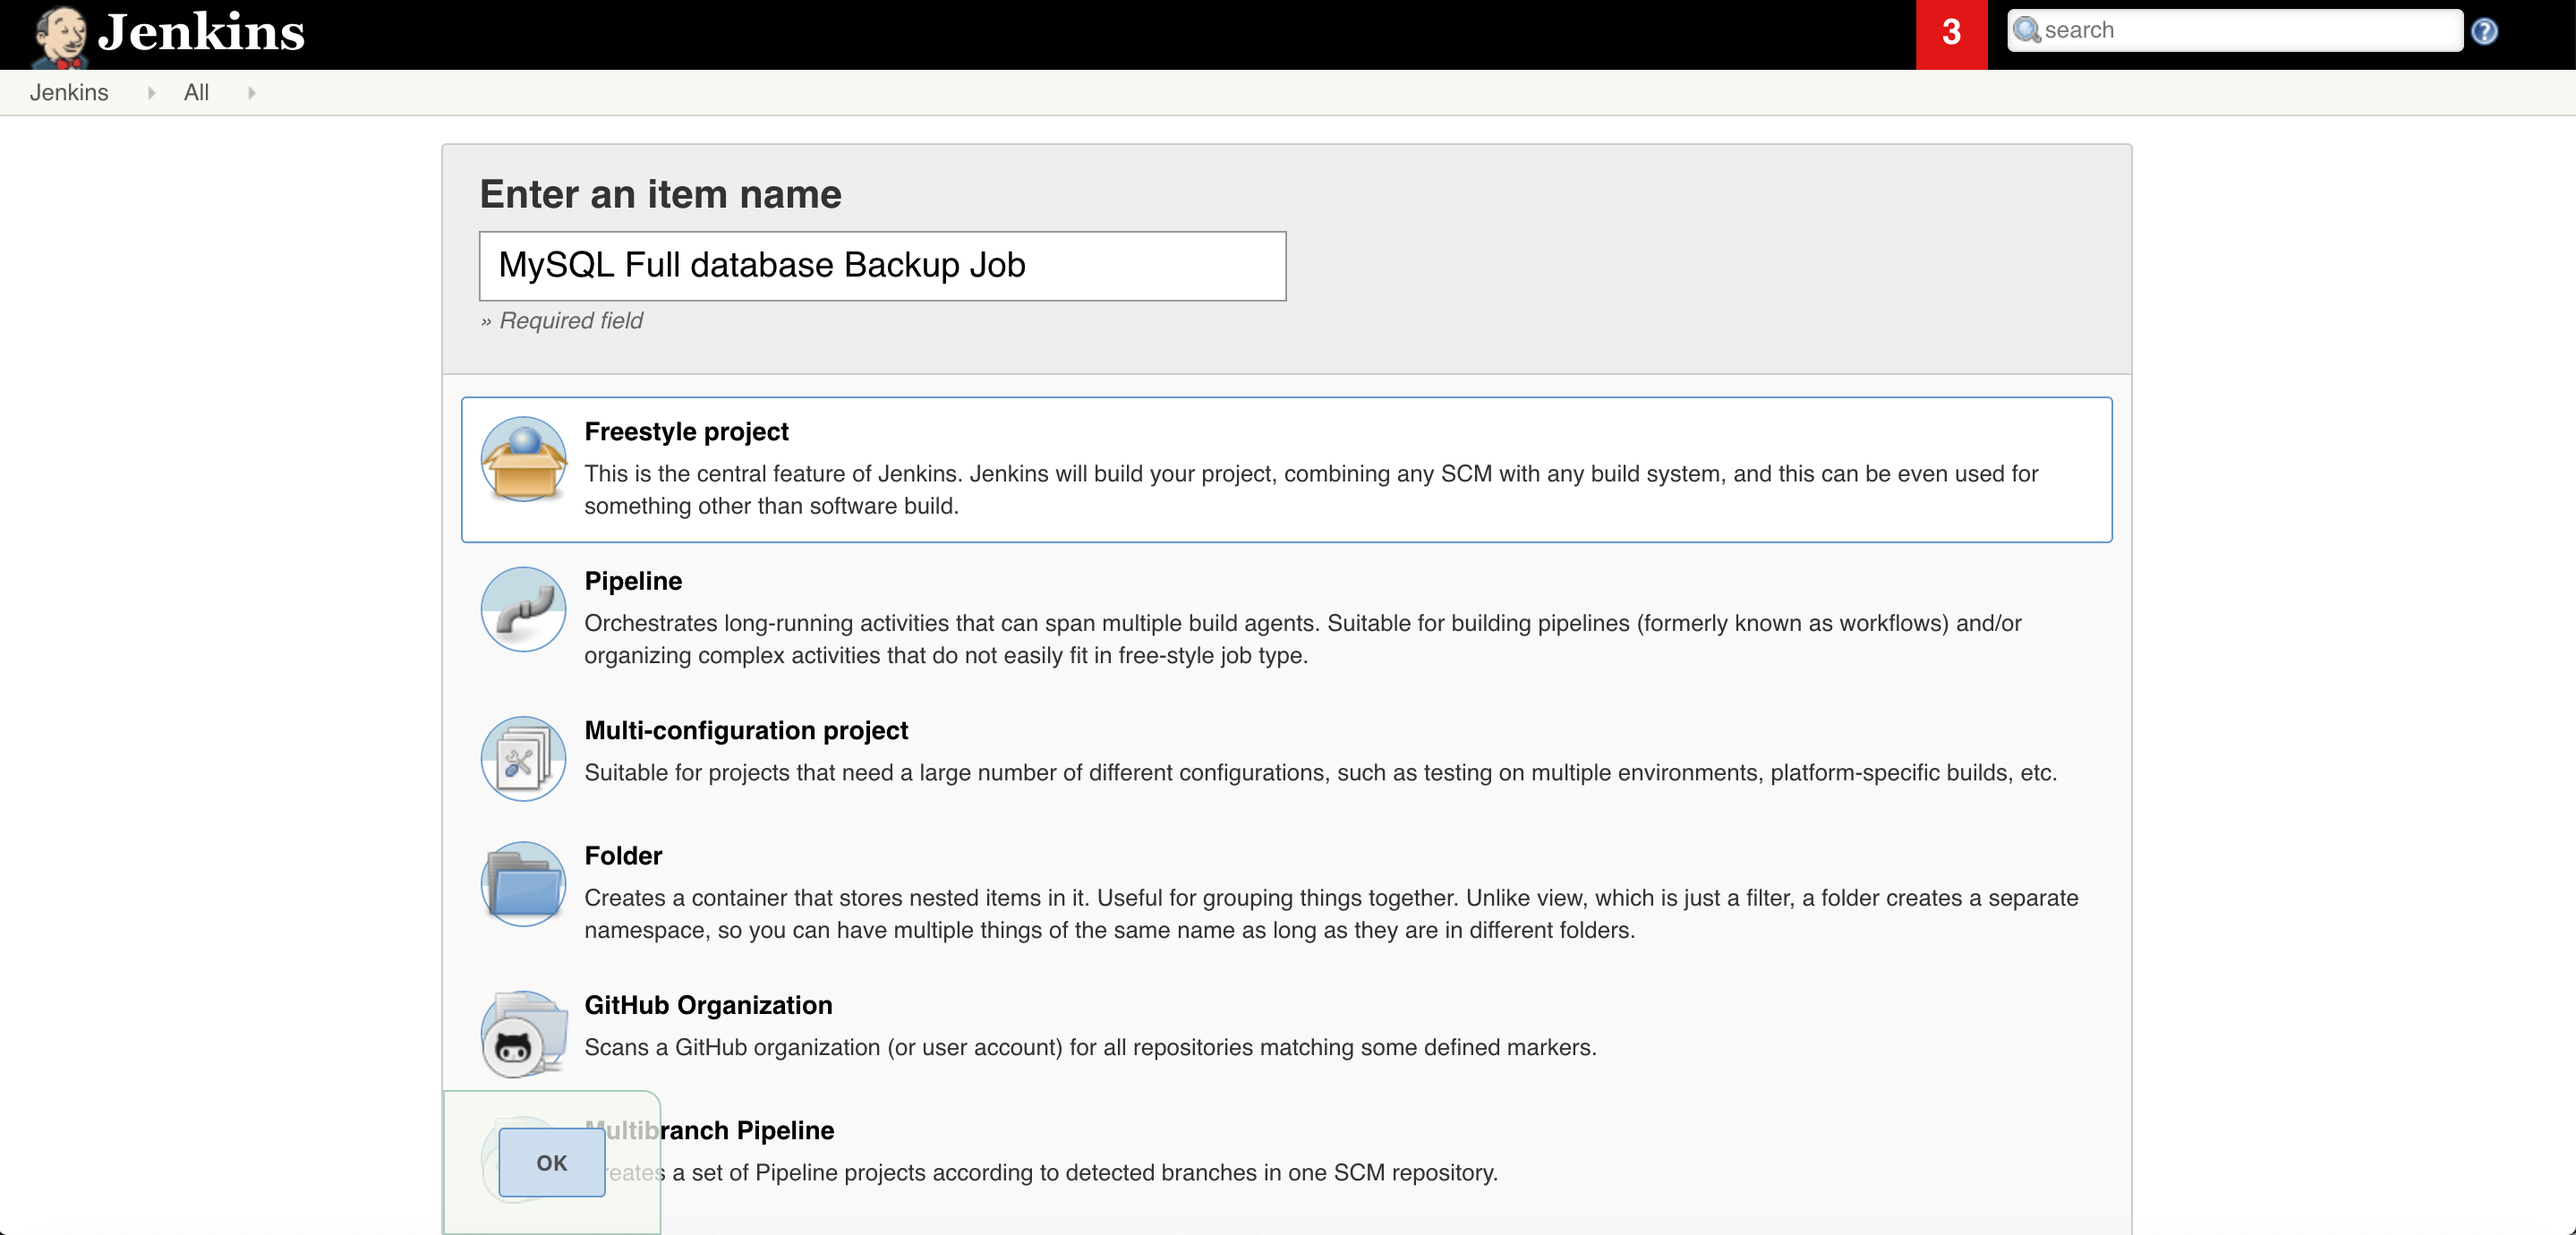
3. Give some Name and select FreeStyle project
4. In the build section click on Add build step radio button and select Execute shell.

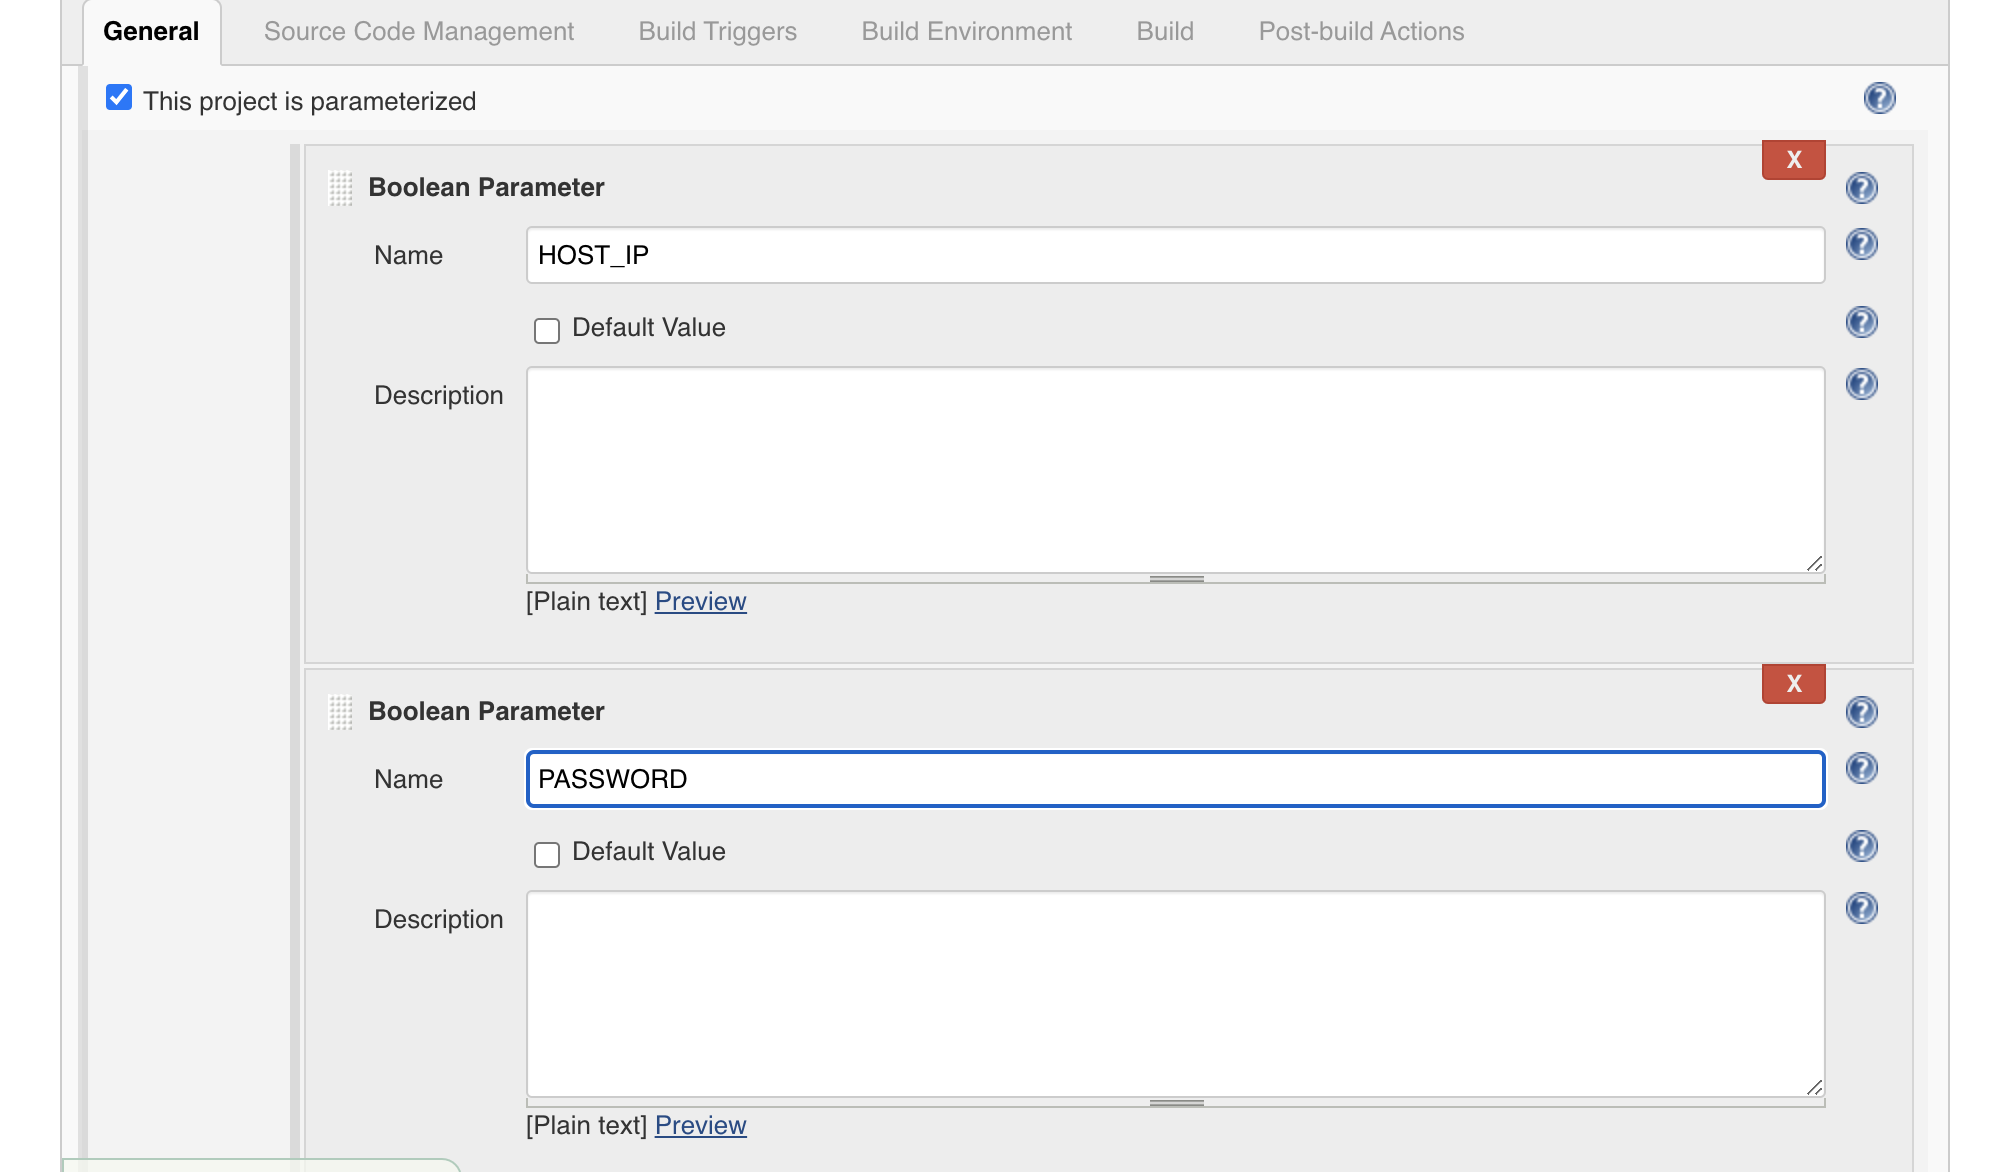
5. Select boolean parameter for MySQL database host and database superuser password which is root password in MySQL database case.
6. In this build part give the shell script name with full path and parameters like $HOST_IP & $Password
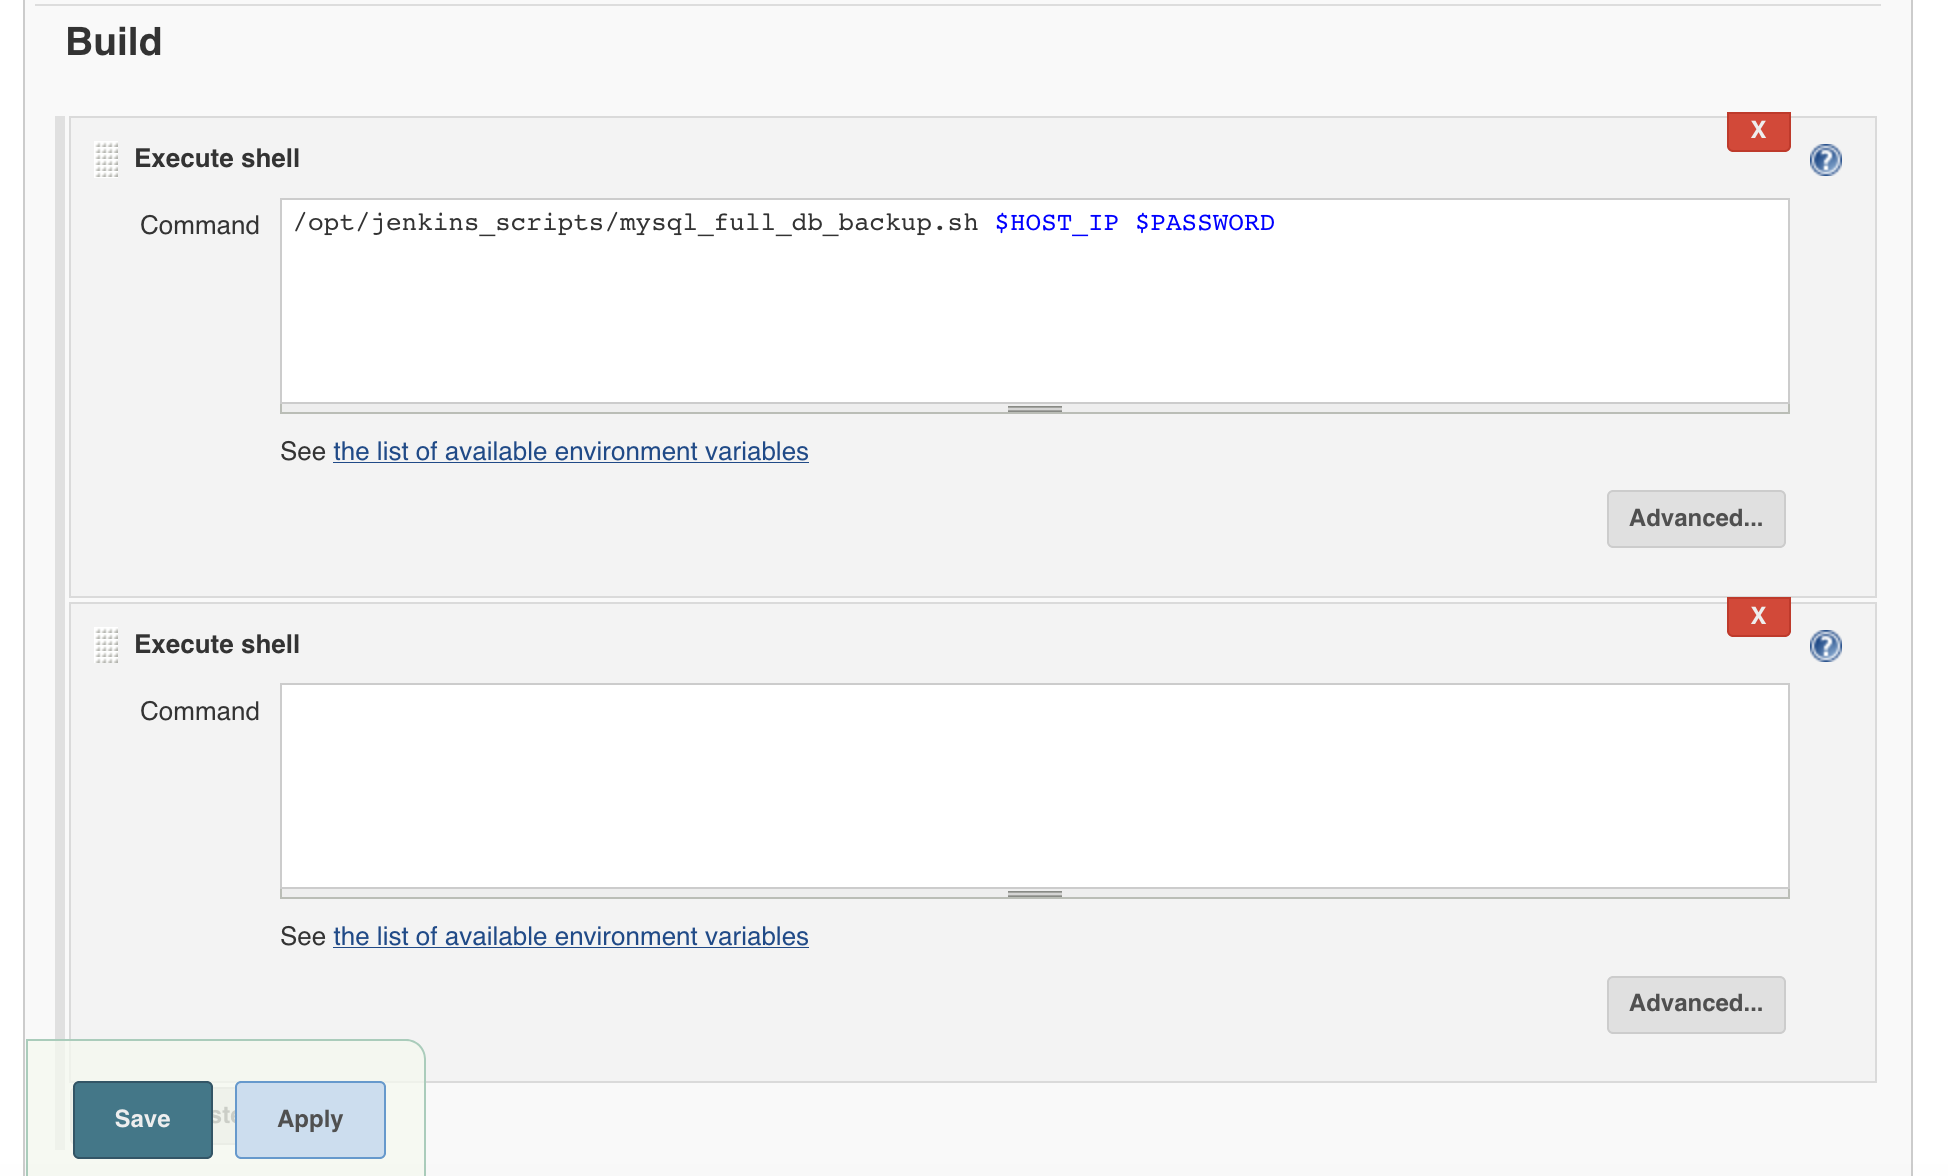
Shell Script
[root@master01 ~]# cat /opt/jenkins_scripts/mysql_full_db_backup.sh
#!/bin/bash
HOST_IP=$1
PASSWORD=$2
echo "starting mysql database full backup"
mysqldump -h $HOST_IP --all-databases --single-transaction --quick --lock-tables=false > /opt/jenkins_scripts/mysql_backup/full_backup_$(date +%F_%N).sql -u root -p$PASSWORD
echo "Backup has been done"
[su_box title=”IMP Note” box_color=”#fe2227″ title_color=”#101112″]Note: Make sure Jenkins have execute (chmod +x /opt/jenkins_scripts/mysql_full_db_backup.sh) privilege on script[/su_box]
7. Let’s execute the Jenkins job
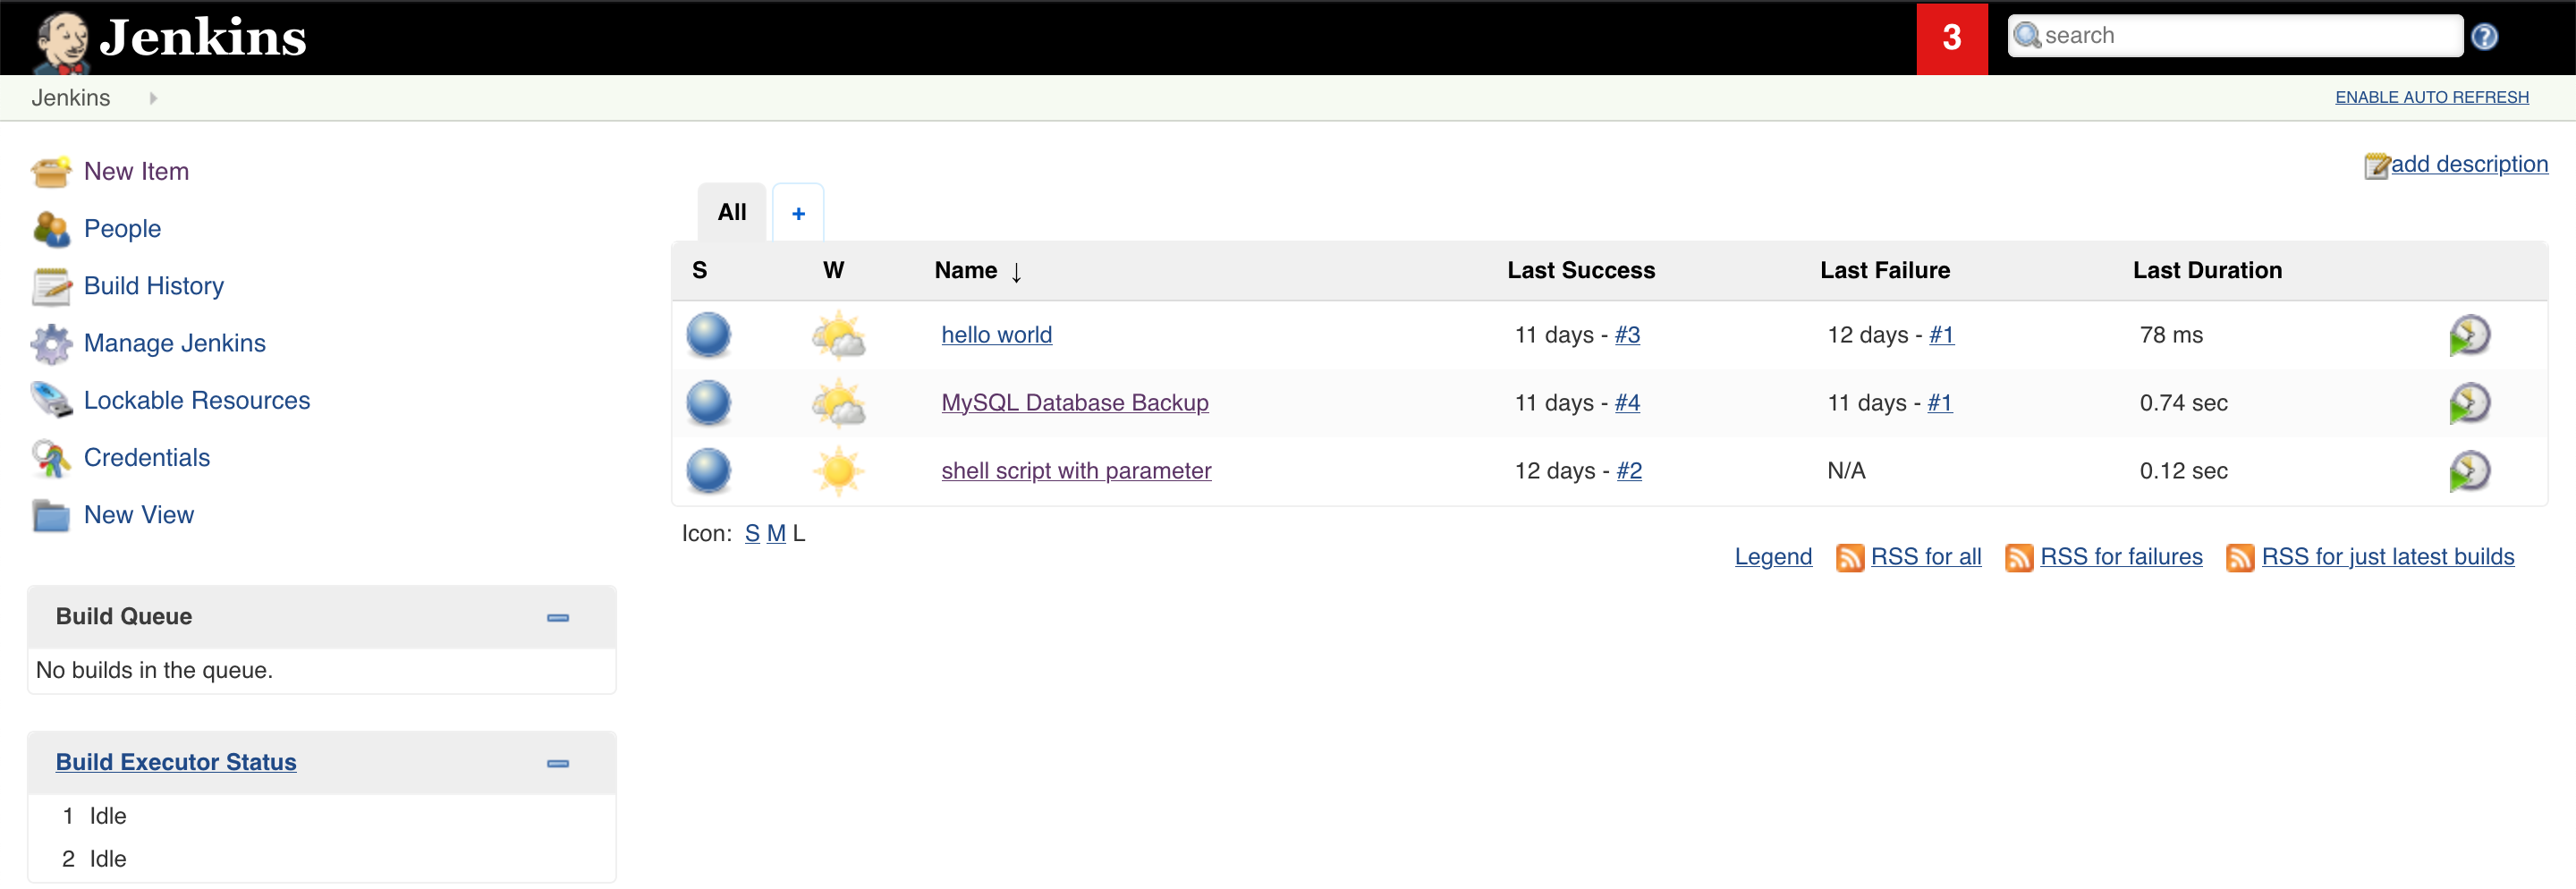
7.1 click on the the MySQL database backup job
7.2 Click on build with Parameter
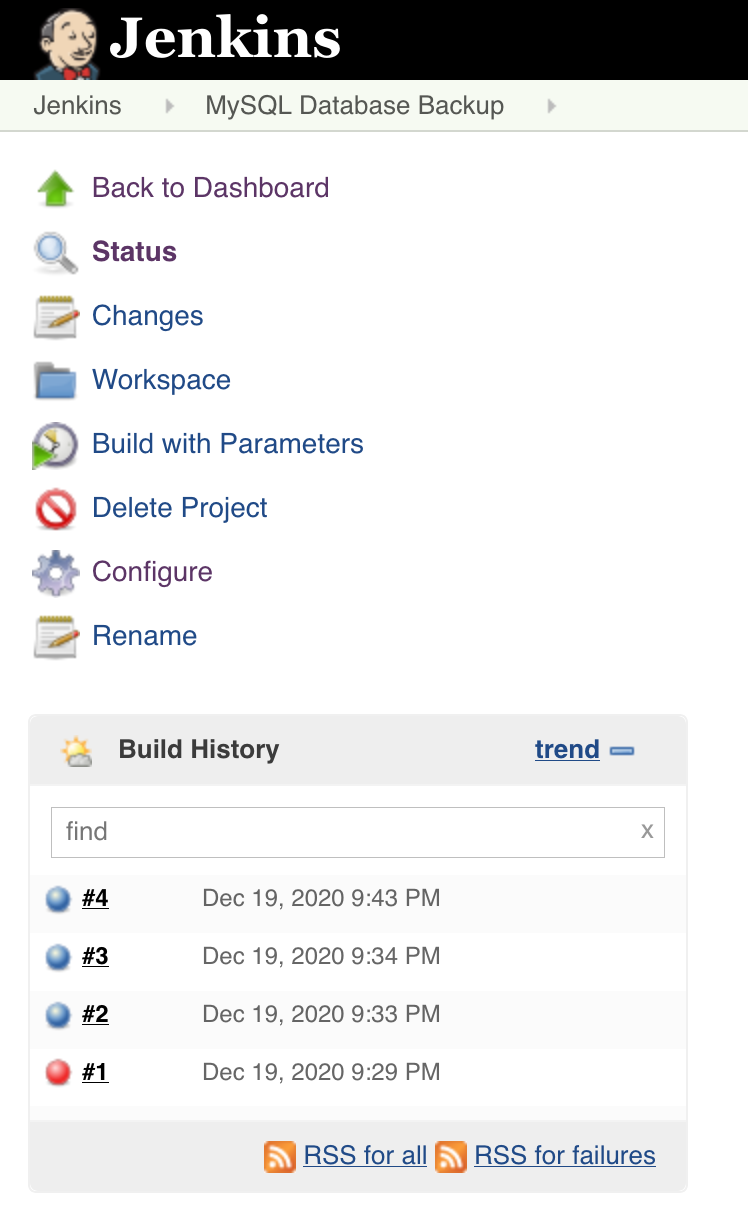
7.3 Give your database server name or IP. In my case Mysql database running on the same server that’s thy, I will give localhost and database root password
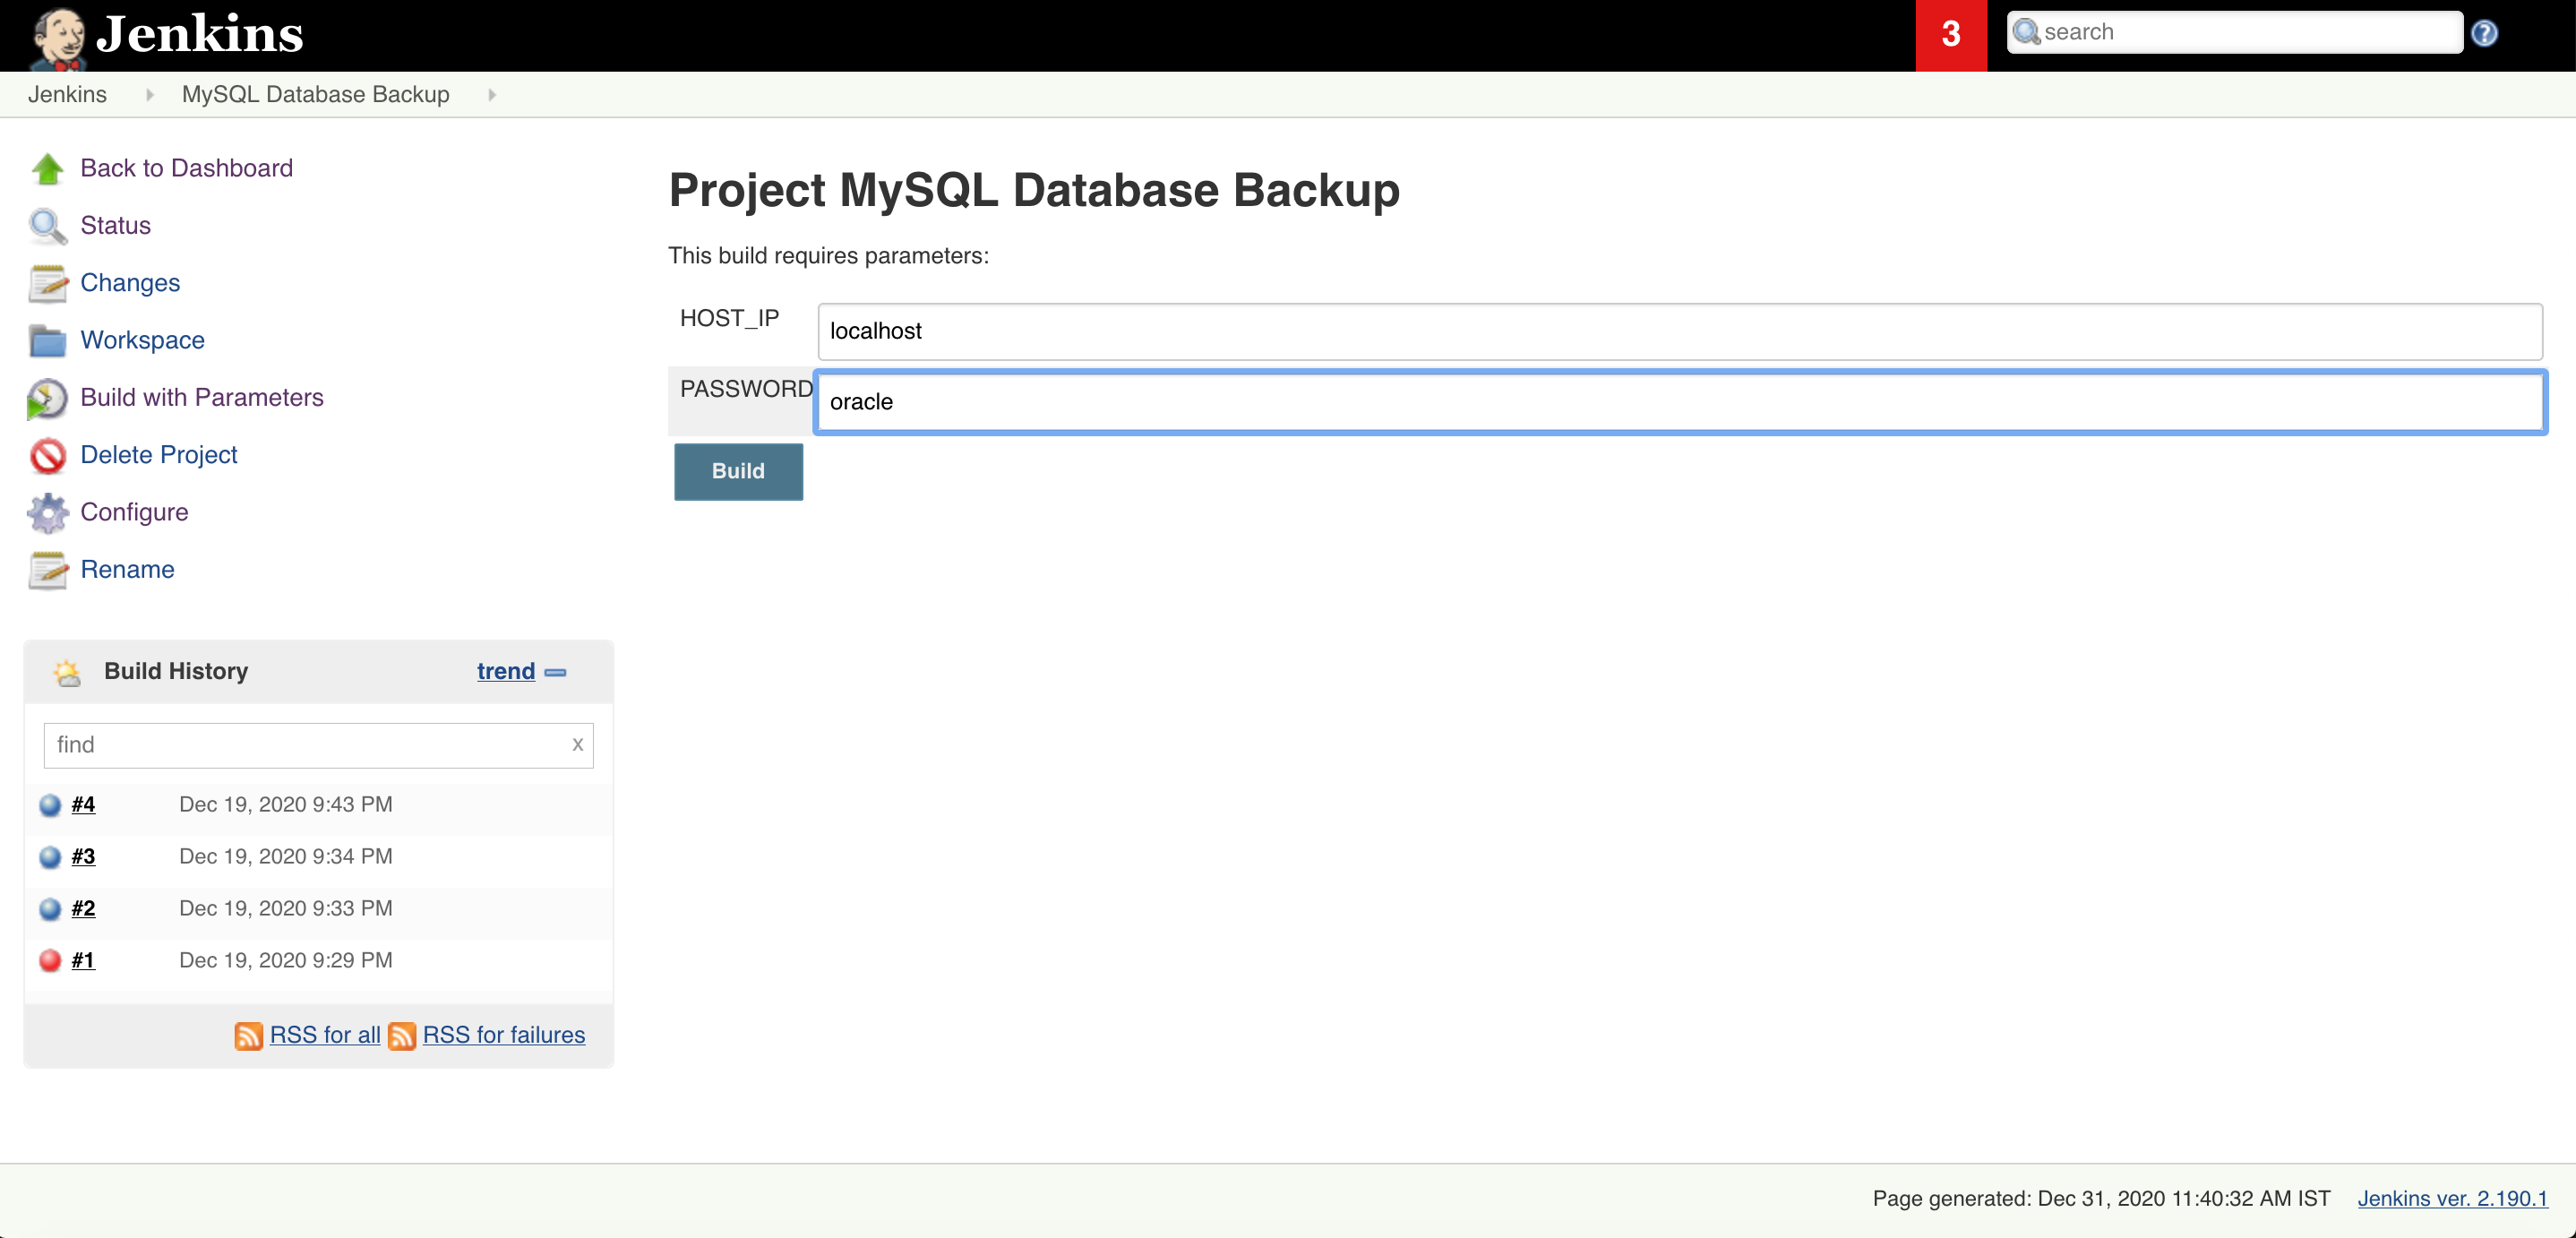
7.4 Once your job is executed go to that job open it in console output mode and check the status of the job. And you are DONE!!!

Read More
How to fix ORA-28368: cannot auto-create wallet
AWS Services and their Azure alternatives
How to Manage AWS S3 Bucket with AWS CLI
How to connect PostgreSQL Database from PgAdmin
How to create AWS rds PostgreSQL Database
Convert pem to ppk
How to Install PuTTy on Window
How to Install and create AWS EC2 Instance using Terraform
AWS MySQL RDS Database Creation using AWSCLI
How to Create MySQL Database with AWS RDS
How to connect to AWS MySQL / MariaDB RDS or EC2 database from MySQL WorkBench
Apache Tomcat: java.net.BindException: Permission denied (Bind failed) :443
How to fix error: Apache tomcat : java.net.BindException: Permission denied (Bind failed) <null>:443
Full Error:
SEVERE: Failed to initialize end point associated with ProtocolHandler ["http-bio-4443"]
java.net.BindException: Permission denied (Bind failed) <null>:4443
	at org.apache.tomcat.util.net.JIoEndpoint.bind(JIoEndpoint.java:413)
	at org.apache.tomcat.util.net.AbstractEndpoint.init(AbstractEndpoint.java:715)
	at org.apache.coyote.AbstractProtocol.init(AbstractProtocol.java:452)
	at org.apache.coyote.http11.AbstractHttp11JsseProtocol.init(AbstractHttp11JsseProtocol.java:119)
	at org.apache.catalina.connector.Connector.initInternal(Connector.java:978)
	at org.apache.catalina.util.LifecycleBase.init(LifecycleBase.java:102)
	at org.apache.catalina.core.StandardService.initInternal(StandardService.java:560)
	at org.apache.catalina.util.LifecycleBase.init(LifecycleBase.java:102)
	at org.apache.catalina.core.StandardServer.initInternal(StandardServer.java:840)
	at org.apache.catalina.util.LifecycleBase.init(LifecycleBase.java:102)
	at org.apache.catalina.startup.Catalina.load(Catalina.java:642)
	at org.apache.catalina.startup.Catalina.load(Catalina.java:667)
	at sun.reflect.NativeMethodAccessorImpl.invoke0(Native Method)
	at sun.reflect.NativeMethodAccessorImpl.invoke(NativeMethodAccessorImpl.java:62)
	at sun.reflect.DelegatingMethodAccessorImpl.invoke(DelegatingMethodAccessorImpl.java:43)
	at java.lang.reflect.Method.invoke(Method.java:498)
	at org.apache.catalina.startup.Bootstrap.load(Bootstrap.java:253)
	at org.apache.catalina.startup.Bootstrap.main(Bootstrap.java:427)
Caused by: java.net.BindException: Permission denied (Bind failed)
	at java.net.PlainSocketImpl.socketBind(Native Method)
	at java.net.AbstractPlainSocketImpl.bind(AbstractPlainSocketImpl.java:387)
	at java.net.ServerSocket.bind(ServerSocket.java:390)
	at java.net.ServerSocket.<init>(ServerSocket.java:252)
	at java.net.ServerSocket.<init>(ServerSocket.java:196)
	at javax.net.ssl.SSLServerSocket.<init>(SSLServerSocket.java:136)
	at sun.security.ssl.SSLServerSocketImpl.<init>(SSLServerSocketImpl.java:71)
	at sun.security.ssl.SSLServerSocketFactoryImpl.createServerSocket(SSLServerSocketFactoryImpl.java:80)
	at org.apache.tomcat.util.net.jsse.JSSESocketFactory.createSocket(JSSESocketFactory.java:256)
	at org.apache.tomcat.util.net.JIoEndpoint.bind(JIoEndpoint.java:400)
	... 17 more
Why, when, and where we get this error?
We get this issue while starting Apache tomcat on secure port 443. The error “java.net.BindException: Permission denied (Bind failed) :443 ” is visible in /usr/share/tomcat/logs/catalina.2016-12-02.log
How to fix it
This error occurs when your Linux firewall levels are set to ‘enforcing‘.To fix this error make it ‘permissive‘
- Check current firewall status using the command ‘getenforce‘
- Edit the file ‘vi /etc/selinux/config’ and make it ‘permissive’ from ‘enforcing’
# This file controls the state of SELinux on the system.
# SELINUX= can take one of these three values:
#       enforcing - SELinux security policy is enforced.
#       permissive - SELinux prints warnings instead of enforcing.
#       disabled - No SELinux policy is loaded.
SELINUX=permissive
# SELINUXTYPE= can take one of these two values:
#       targeted - Targeted processes are protected,
#       mls - Multi Level Security protection.
SELINUXTYPE=targeted
- Reboot the system using ‘reboot‘ as the root
- After reboot check, if tomcat is up with 443 port
netstat -plan| grep 443
- And check the tomcat URL with ssl/https (https://localhost:443)
Leave a comment if you find the article helpful.
Read More
How to fix ORA-28368: cannot auto-create wallet
AWS Services and their Azure alternatives
How to Manage AWS S3 Bucket with AWS CLI
How to connect PostgreSQL Database from PgAdmin
How to create AWS rds PostgreSQL Database
Convert pem to ppk
How to Install PuTTy on Window
How to Install and create AWS EC2 Instance using Terraform
AWS MySQL RDS Database Creation using AWSCLI
How to Create MySQL Database with AWS RDS
How to connect to AWS MySQL / MariaDB RDS or EC2 database from MySQL WorkBench
How to Configure Oracle Transparent Data Encryption (TDE) on Standby Database
How to Configure Oracle Transparent Data Encryption (TDE) on Standby Database
In this article, we will see how to enable Oracle Transparent Data Encryption TDE on the Standby database with easy and simple steps. If we have Oracle Transparent Data Encryption TDE enabled primary database standby database won’t be able to apply the logs. And it may possible that it could out of synchronization from the primary side.
I would recommend enabling Oracle Transparent Data Encryption TDE on standby along with the primary database. If you do it later you might see standby is out of synchronization with Primary database. Rebuilding a big database standby database is a complex and time-consuming task. In this way, you can enable Oracle Transparent Data Encryption TDE with few easy steps. Primary and standby could be TDE enabled in the same downtime window.
Oracle Transparent Data Encryption TDE is one of the ways in Oracle Advanced security to secure the database physical datafiles.
On Standby Database
[su_note note_color=”#0174be” text_color=”#ffffff” radius=”4″]TDE Prerequisites[/su_note]
Make sure OPtach 23315889 has been applied to oracle standby database oracle home
opatch lsinventory| grep 23315889
On Primary Database
1. Login to Primary database and get the wallet path.
SQL>select WRL_PARAMETER from v$encryption_wallet;

WRL_PARAMETER
--------------------------------------------------------------------------------
/u01/oracle/admin/wallet/testdb01/
2. Check the wallet key files.
ls -lrt /u01/oracle/admin/wallet/testdb01

-rw-------. 1 oracle oninstall 2093 Jun 9 06:59 ewallet.p12
-rw-------. 1 oracle oninstall 1928 Jun 9 07:24 cwallet.sso
3. Zip the keys and Copy the files to the standby server.
cd /u01/oracle/admin/wallet/testdb01
zip /tmp/walletkeys.zip *
scp /u01/oracle/admin/wallet/testdb01/*wallet.* 192.168.56.5:/tmp
On Standby Database
1. Go to the Standby data $TNS_ADMIN and add the wallet path.
cd $TNS_ADMIN
vim sqlnet.ora

--add following line

ENCRYPTION_WALLET_LOCATION = (SOURCE = (METHOD = FILE) (METHOD_DATA = (DIRECTORY = /u01/oracle/admin/$ORACLE_SID/wallet/)))
2. Make the directory
mkdir -p /u01/oracle/admin/$ORACLE_SID/wallet/

Note: $ORACLE_SID is your database Name
3. Copy the primary database key to standby wallet location.
cd /tmp
unzip walletkeys.zip
cp /tmp/*wallet*.* /opt/oracle/admin/$ORACLE_SID/wallet/wallet_tde
3. Stop Standby recovery the standby database.
sqlplus "/as sysdba"

SQL> alter database recover managed standby database cancel;

SQL> shutdown immediate
4. Start the standby database in read-only mode.
SQL> Startup;
5. Check wallet path it should be Open and Autologin mode.
SQL> select status,wallet_type from v$encription_wallet;

status wallet_type
--------------------------------
OPEN AUTOLOGIN
6. Prepare the tablespace datafile encryption script.
$ sqlplus / as sysdba
SQL>set heading off
SQL>set linesize 150
SQL>spool tablespace_datafiles_encrypt.sql
SQL>select 'alter database datafile ''' || file_name ||''' encrypt;' from dba_data_files where tablespace_name not in ('SYSTEM','SYSAUX','TEMP1','TEMP2','APPS_UNDOTS1');
SQL>exit
[su_box title=”IMP Note” box_color=”#fe2227″ title_color=”#101112″] Make sure you leave following table space database in encryption script ‘SYSTEM’, ‘SYSAUX’,’TEMP1′,’TEMP2′,’APPS_UNDOTS1′[/su_box]
7. Stop the Standby Database again.
SQL> Shutdown normal;
8. Start the database in mount mode.
SQL> startup mount
9. Run the database encryption script.
SQL> @tablespace_datafiles_encrypt.sql
10. Once Tablespace encrypt script is completed successfully Start the standby recovery.
SQL> alter database recover managed standby database disconnect;
20. Monitor standby log apply. If you see logs are applying properly on standby side. You are Done!
SQL> select process, status, thread#, sequence#, from v$managed_standby;

PROCESS STATUS THREAD# SEQUENCE#
------- ------------ ---------- ----------
MRP0 APPLYING_LOG 1 10293
Hope you will find this article helpful. in case if you have any questions ask me my comments.
Like our Facebook Page
Read More
How to fix ORA-28368: cannot auto-create wallet
AWS Services and their Azure alternatives
How to Manage AWS S3 Bucket with AWS CLI
How to connect PostgreSQL Database from PgAdmin
How to create AWS rds PostgreSQL Database
Convert pem to ppk
How to Install PuTTy on Window
How to Install and create AWS EC2 Instance using Terraform
AWS MySQL RDS Database Creation using AWSCLI
How to Create MySQL Database with AWS RDS
How to connect to AWS MySQL / MariaDB RDS or EC2 database from MySQL WorkBench
How to fix ORA-28368: cannot auto-create wallet
How to fix ORA-28368: cannot auto-create wallet
While starting the database or configuring TDE (Transparent Data Encryption) which comes under Oracle Advance Security. TDE is Tablespace encryption which saves the tablespace data from unauthorized access. Transparent Data Encryption only works on tablespace level not with database object level or Tables. You might have seen ora-26368:cannot auto-create wallet. There are easy fixes for this error. ORA-28368 mostly related to oracle wallet Parameter and wallet path mismatch. Oracle wallet is the option where the oracle database stores the encryption key.

Full error
SQL> startup
ORACLE instance started.
Total System Global Area 1761607680 bytes
Fixed Size 2925360 bytes
Variable Size 536874192 bytes
Database Buffers 1207959552 bytes
Redo Buffers 13848576 bytes
Database mounted.
Database opened.
SQL> alter system set encryption key identified by “oracle”;
alter system set encryption key identified by “oracle”
*
ERROR at line 1:
ORA-28368: cannot auto-create wallet
Solutions
1. Check the path of the wallet in sqlnet.ora path should exist.
2. Extra space in starting of “ENCRYPTION_WALLET_LOCATION” in sqlnet.ora
3. Wallet file ewallet.p12 or ewallet.sso have wrong permission. It should be “chmod 600 ewallet.p12“
Read More
How to connect PostgreSQL Database from PgAdmin
How to create AWS rds PostgreSQL Database
Convert pem to ppk
How to Install PuTTy on Window
How to Install and create AWS EC2 Instance using Terraform
AWS MySQL RDS Database Creation using AWSCLI
How to Create MySQL Database with AWS RDS
How to connect to AWS MySQL / MariaDB RDS or EC2 database from MySQL WorkBench
